How I Built a Real-Time Chat featured Forum with Go, WebSockets, and JavaScript
Objectives (opens in a new tab) for this project:
Implement registration and login functionality with a registration form and allow users to log out from any page on the forum.
Enable users to create posts with categories, create comments on posts, and view posts in a feed display with comments visible only when clicked on.
Implement private messaging between users with a chat section showing who is online/offline and able to talk to, organized by the last message sent.
Messages should have a specific format with a date showing when the message was sent and the user name identifying the sender.
Messages should work in real time with notifications of new messages received without refreshing the page, using WebSockets in backend and frontend.
Use SQLite to store data like in the previous forum and Golang to handle data and WebSockets in backend, and Javascript to handle all frontend events and clients WebSockets.
Create a single page application with one HTML file to handle any changes of page in Javascript.
Allowed packages include all standard go packages, Gorilla Websocket, sqlite3, bcrypt, and UUID.
This project will help learn about the basics of web development, Go routines and channels, WebSockets, SQL language, and manipulation of databases.
Project Planning: The Good, The Bad, and The...
Starting a new project is always exciting, especially when you work as part of a team. It brings opportunities to work with new people, learn from each other, and possibly even make new friends in the process. For this project, I got together with my colleagues, M. and Md., and formed a group. I was excited to tackle the task at hand and create a great web app in terms of functionality and code.
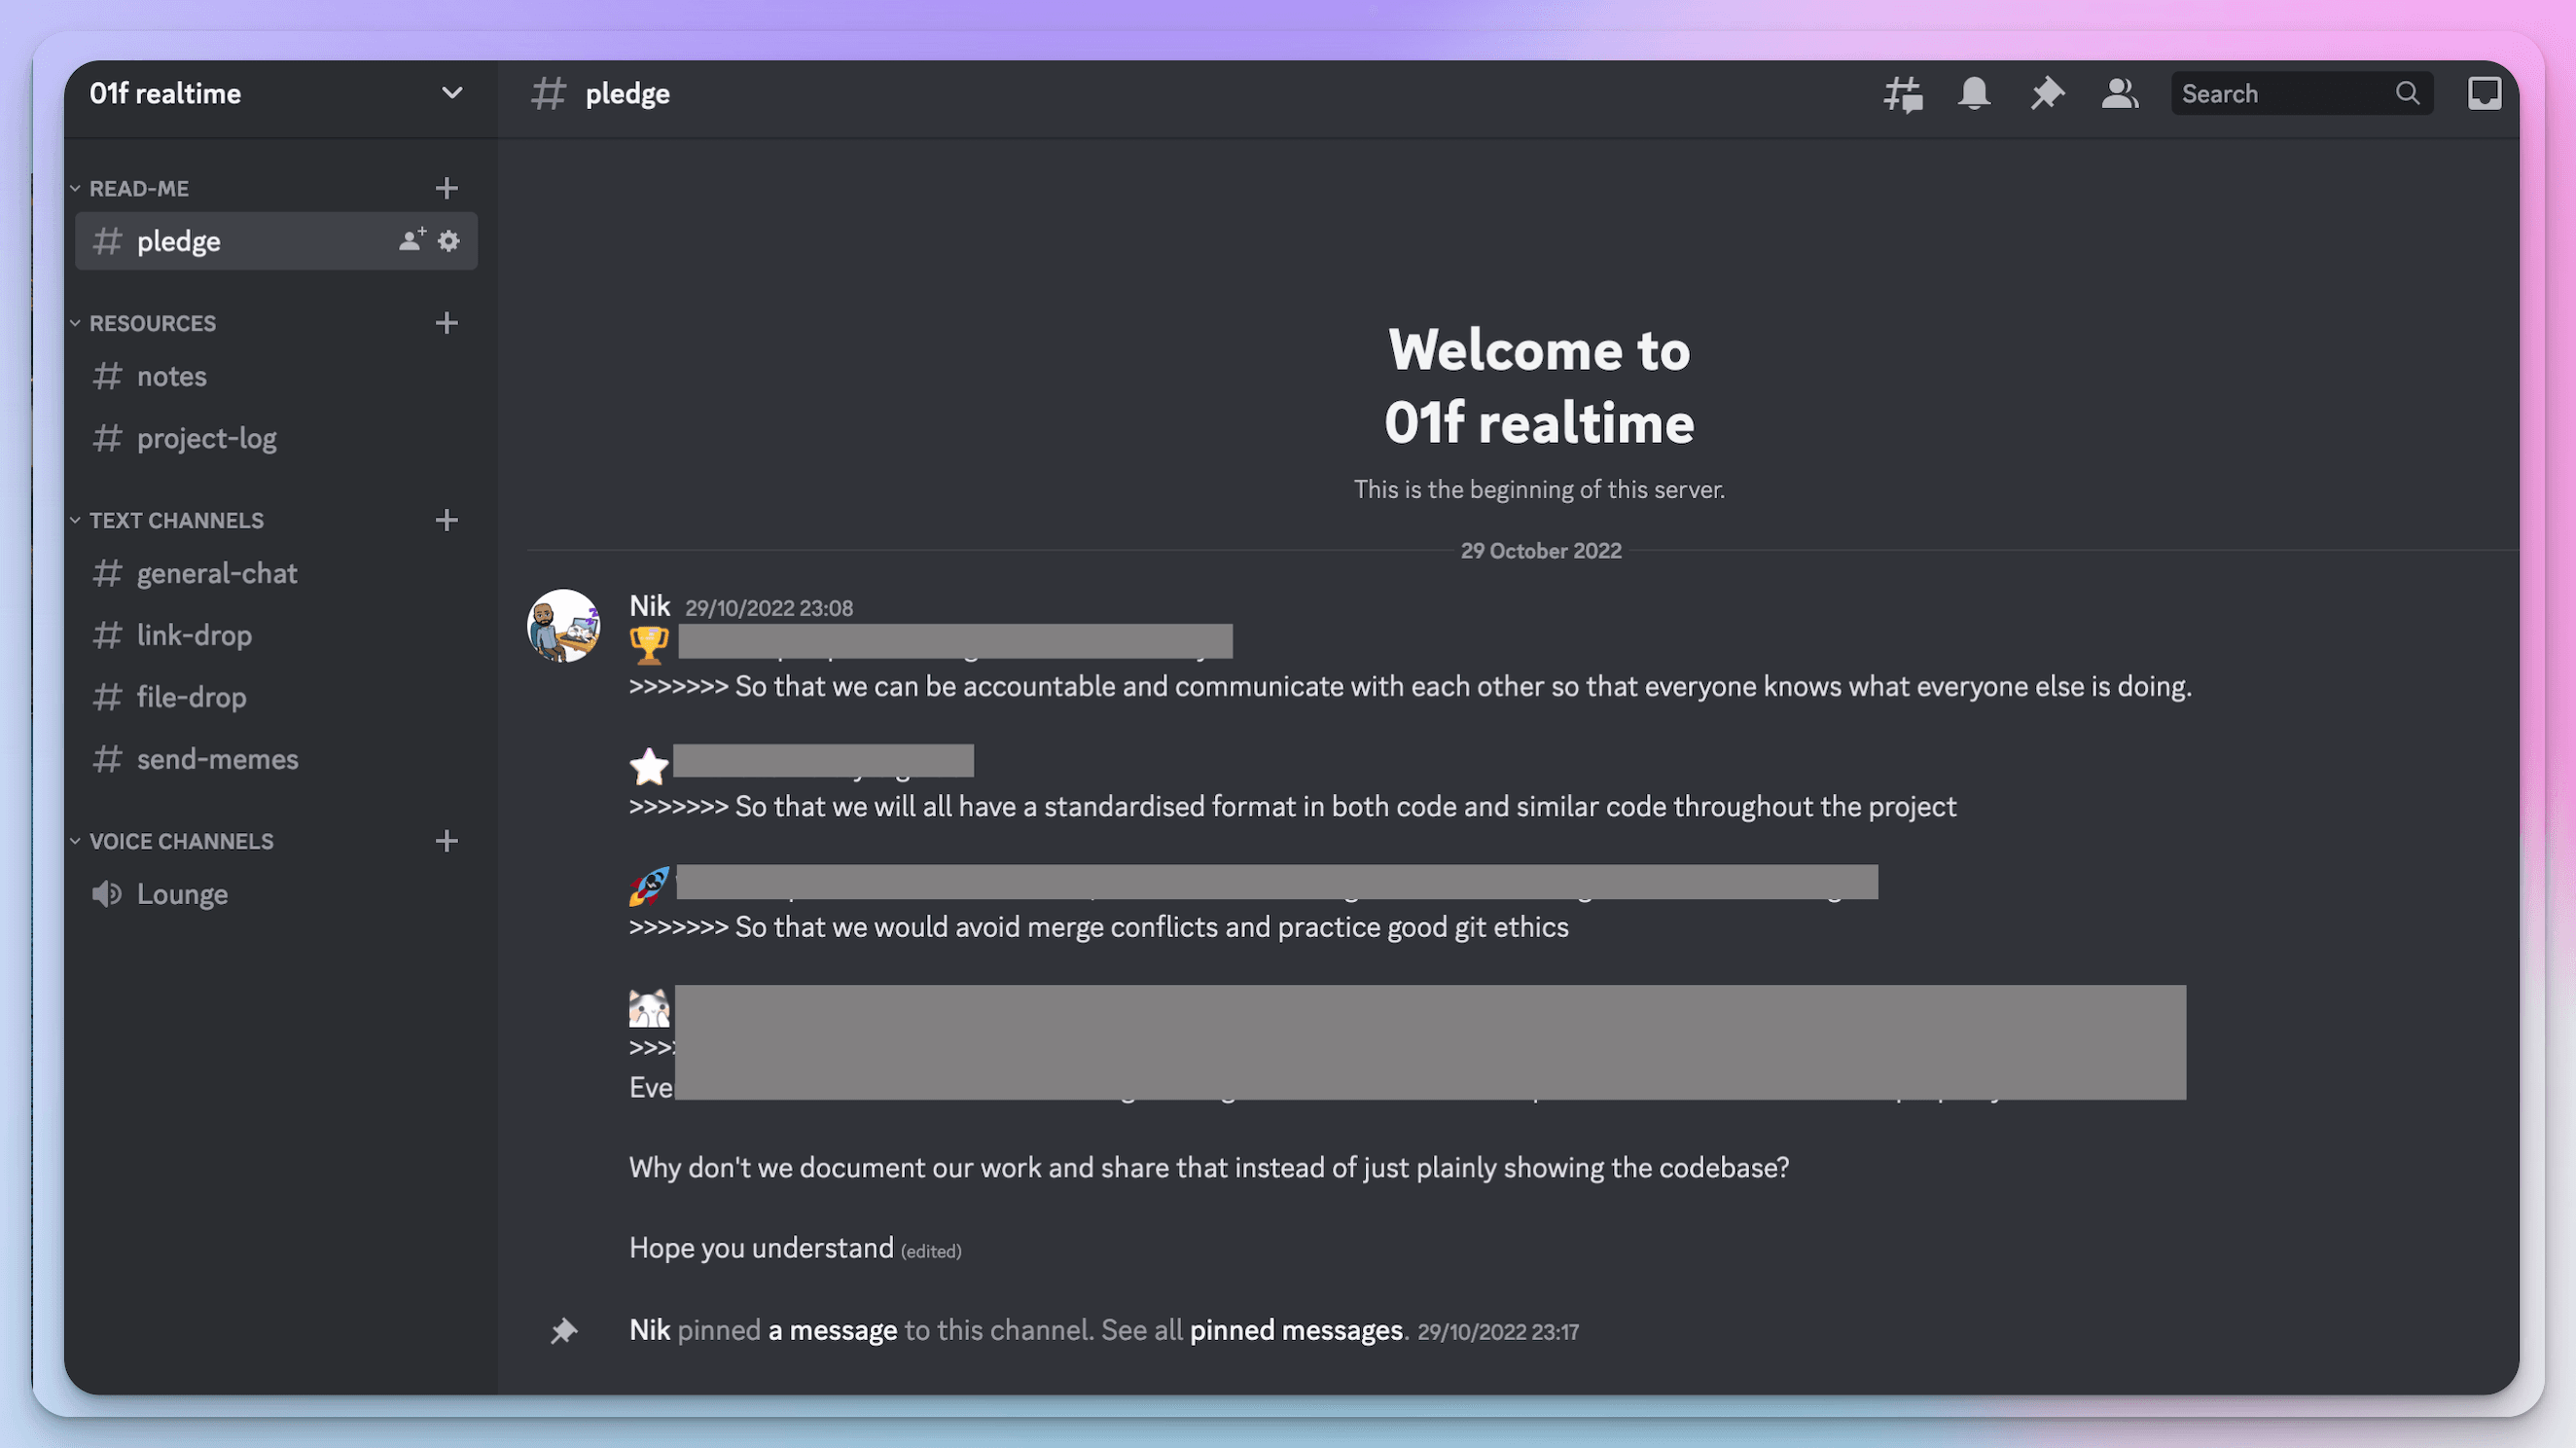
To ensure effective communication, I created a Discord channel and established some ground rules based on my experience from my previous project.
After setting up an initial meeting, we planned how we were going to approach the task and delegated tasks to each other. M. and I decided to tackle backend tasks, while Md. was to work on the front-end.
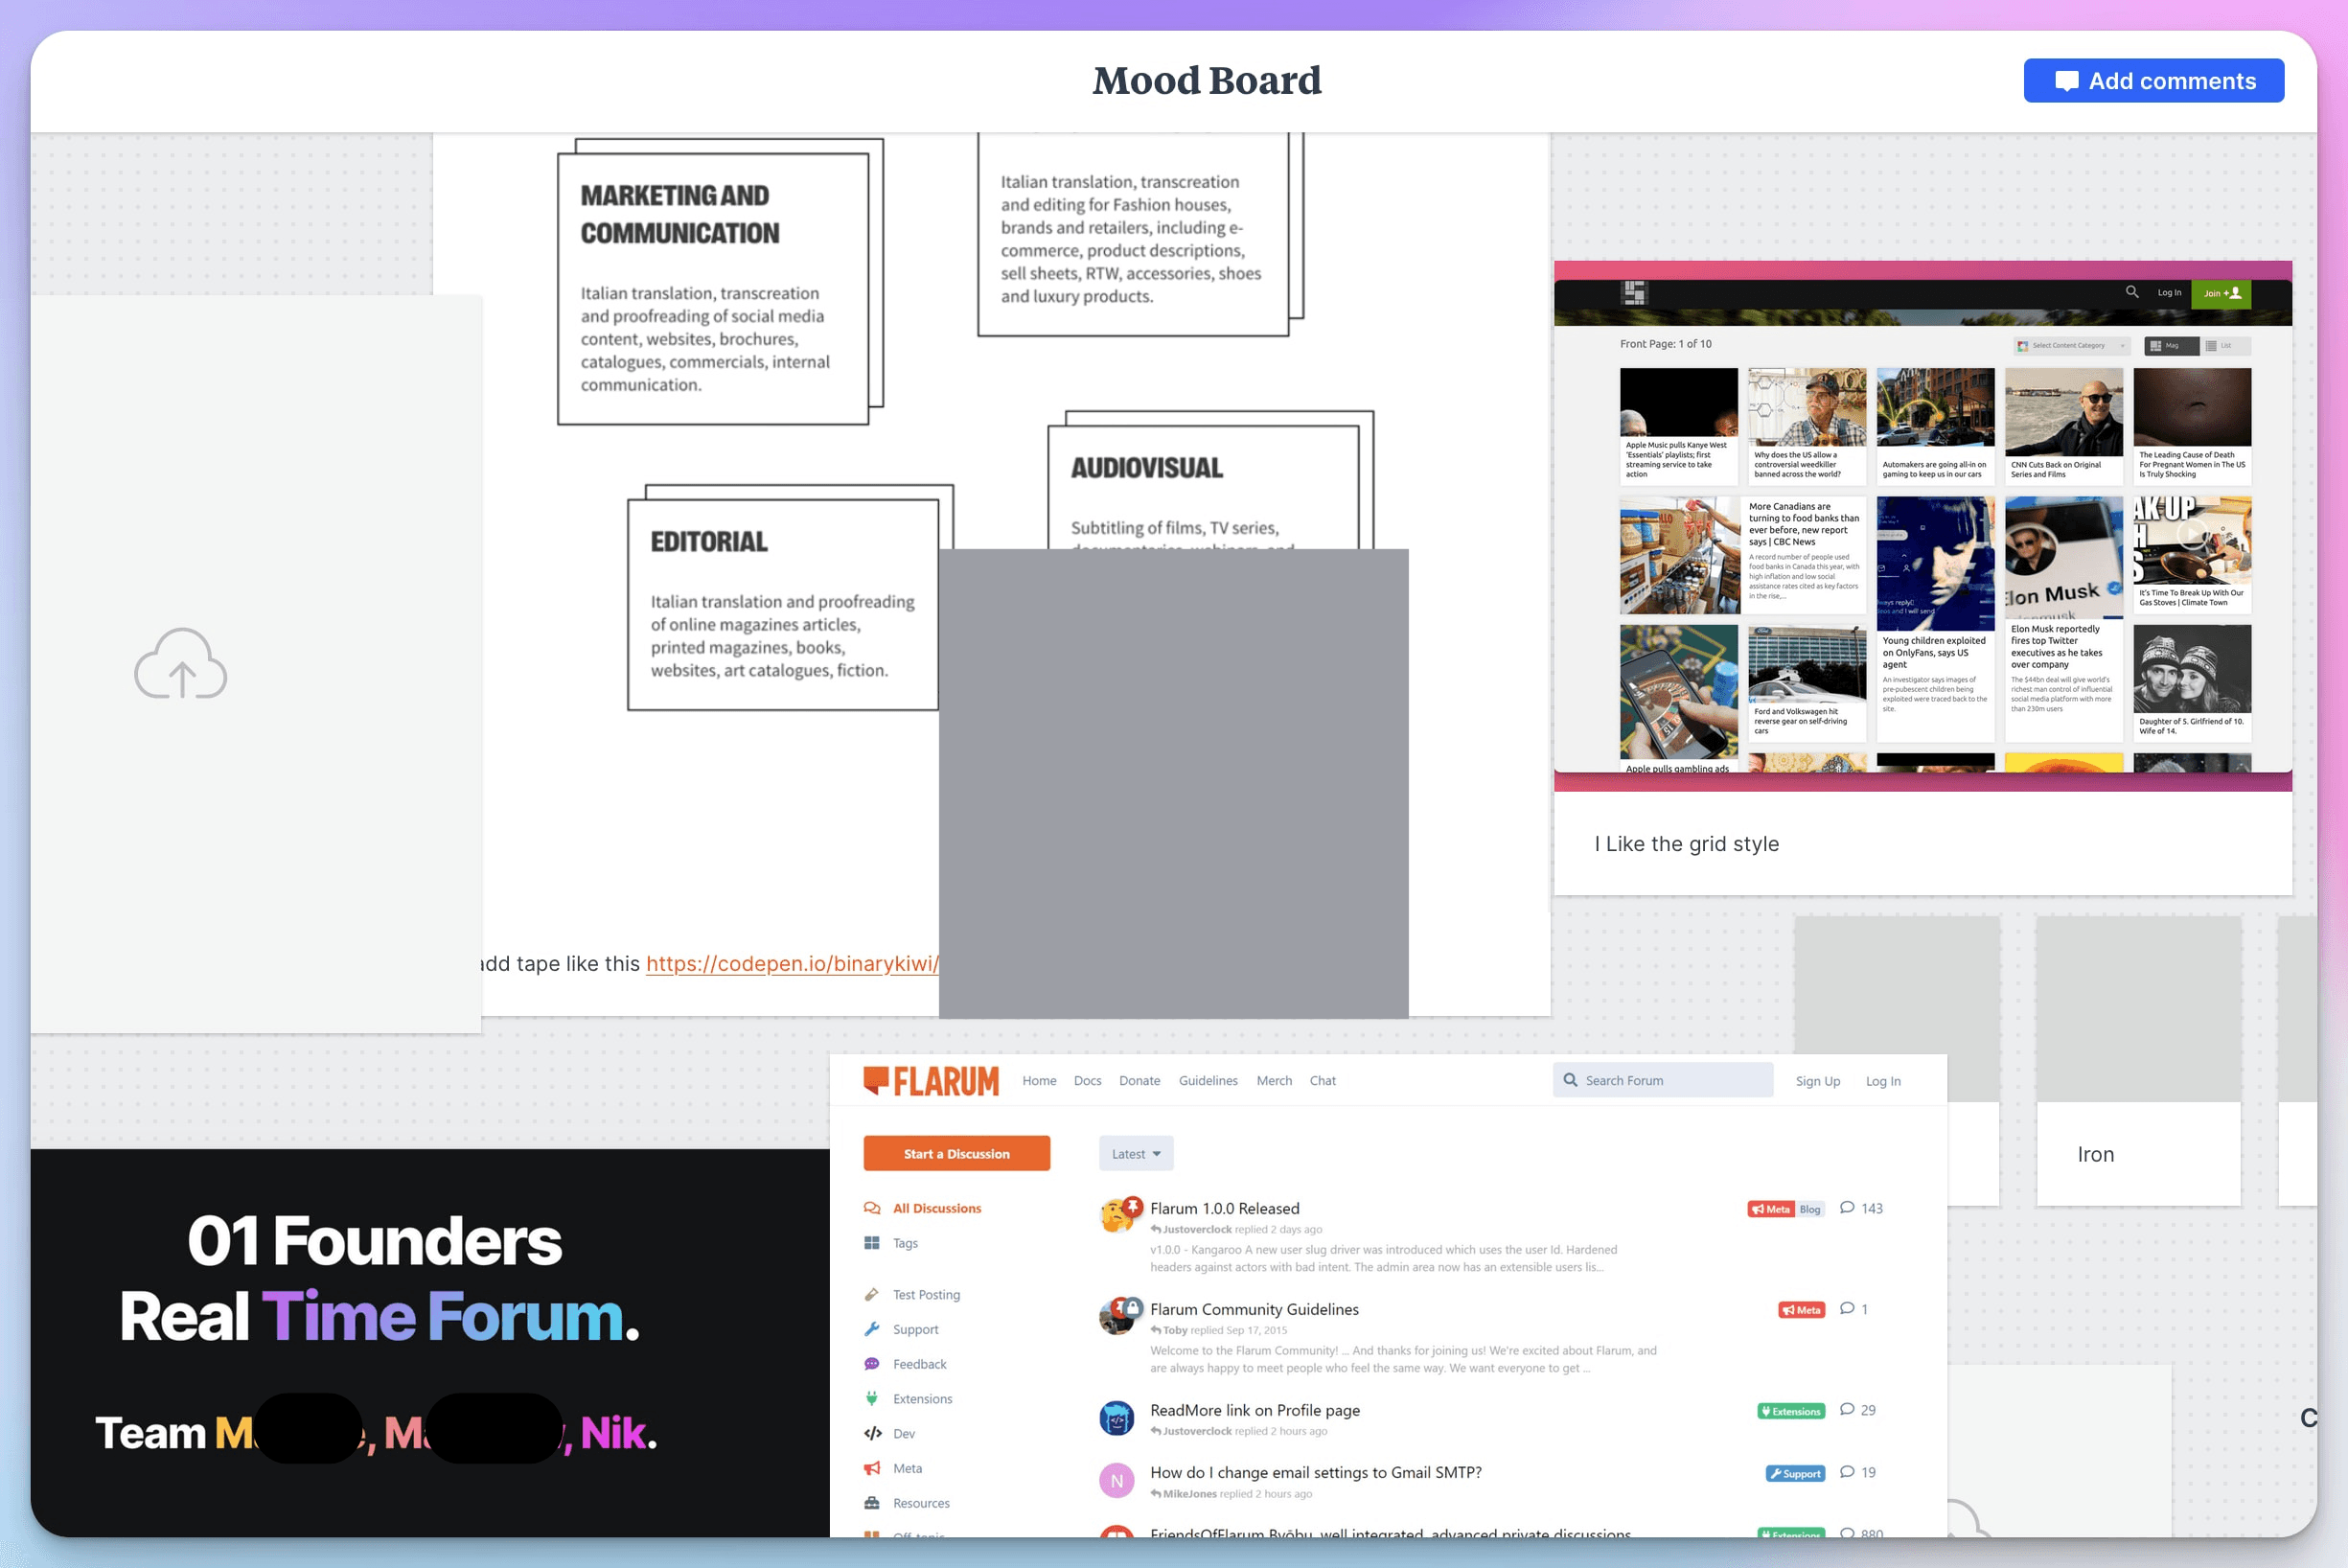
During the planning phase of our forum project, our group encountered difficulties in agreeing on a specific theme due to its broad scope. The forum app could be about anything. To keep things moving forward, we decided to create some general categories for now and keep it open.
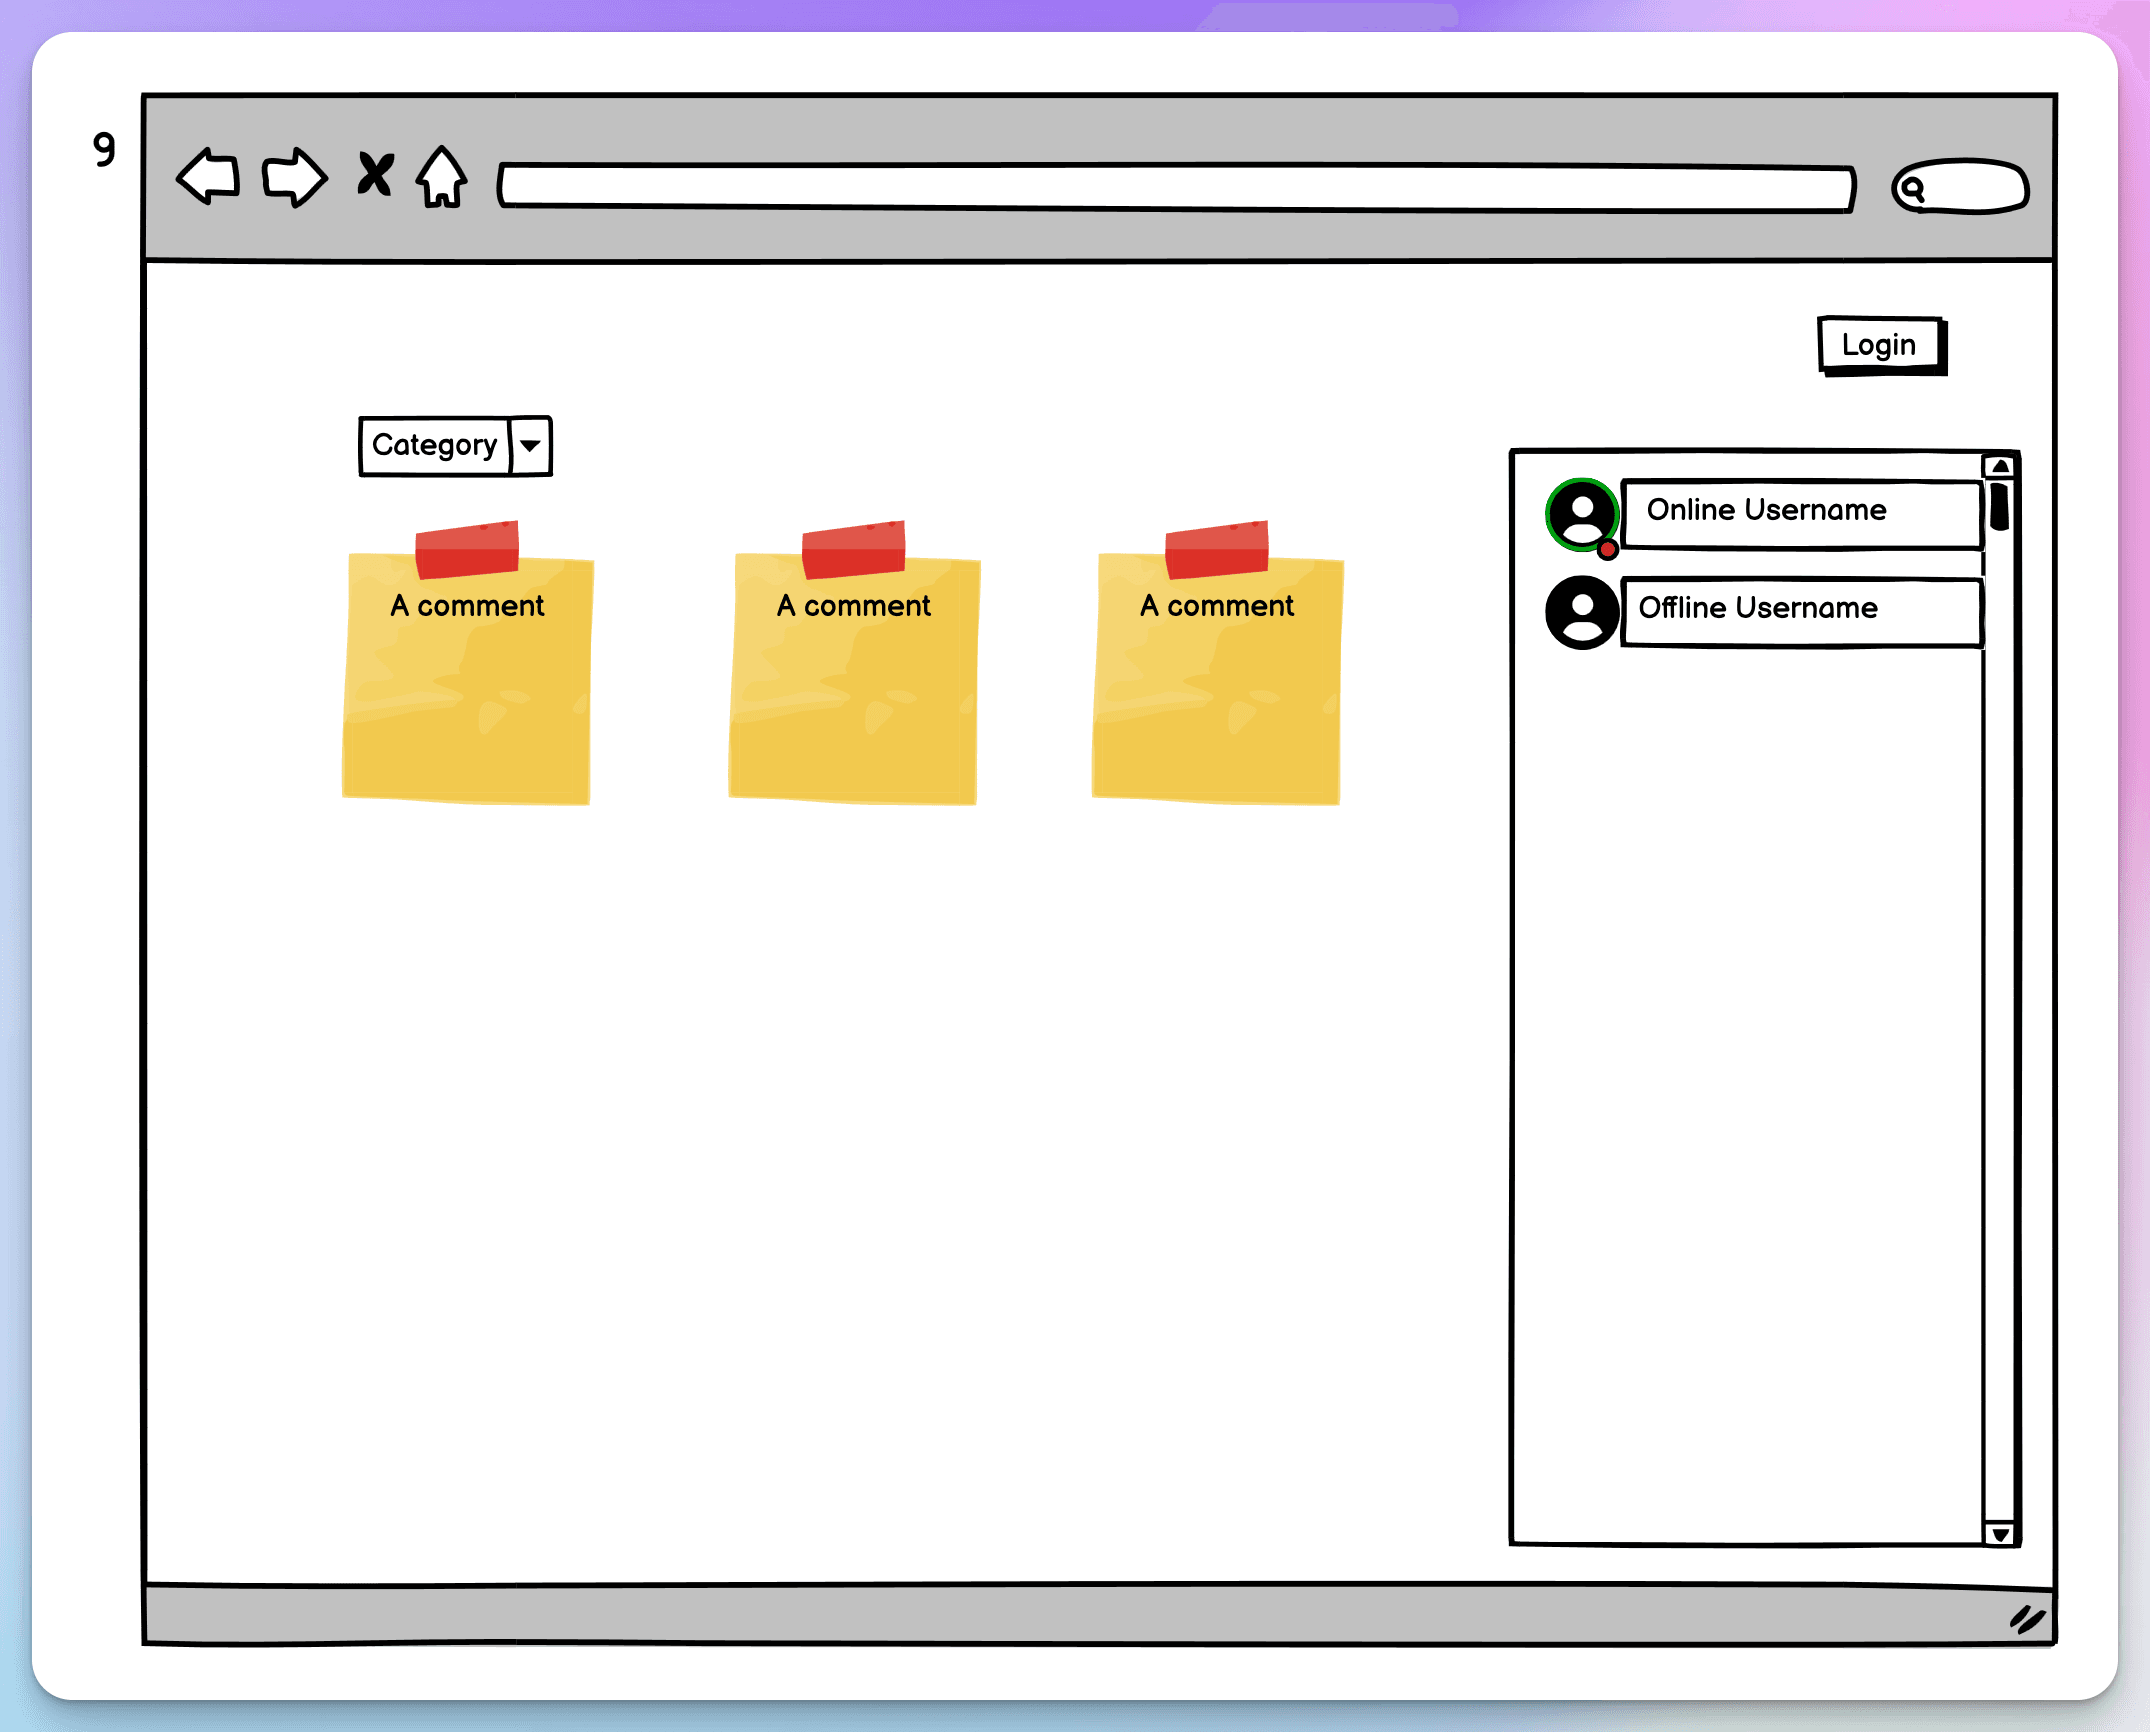
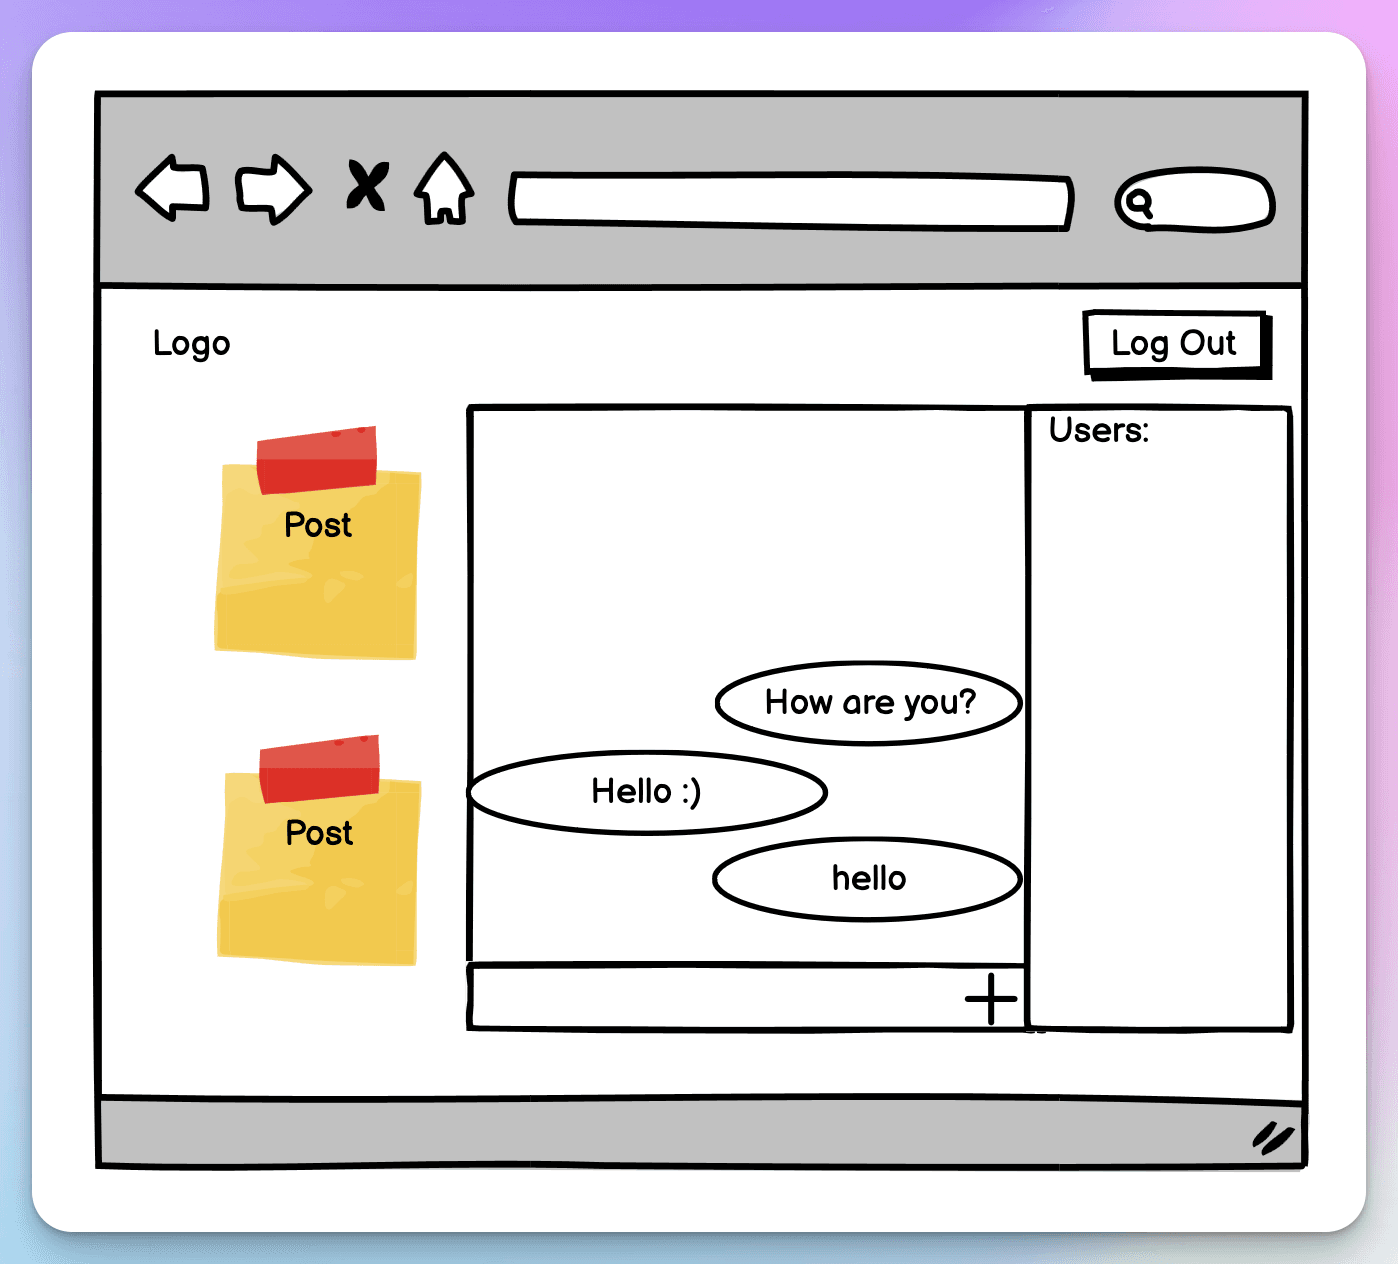
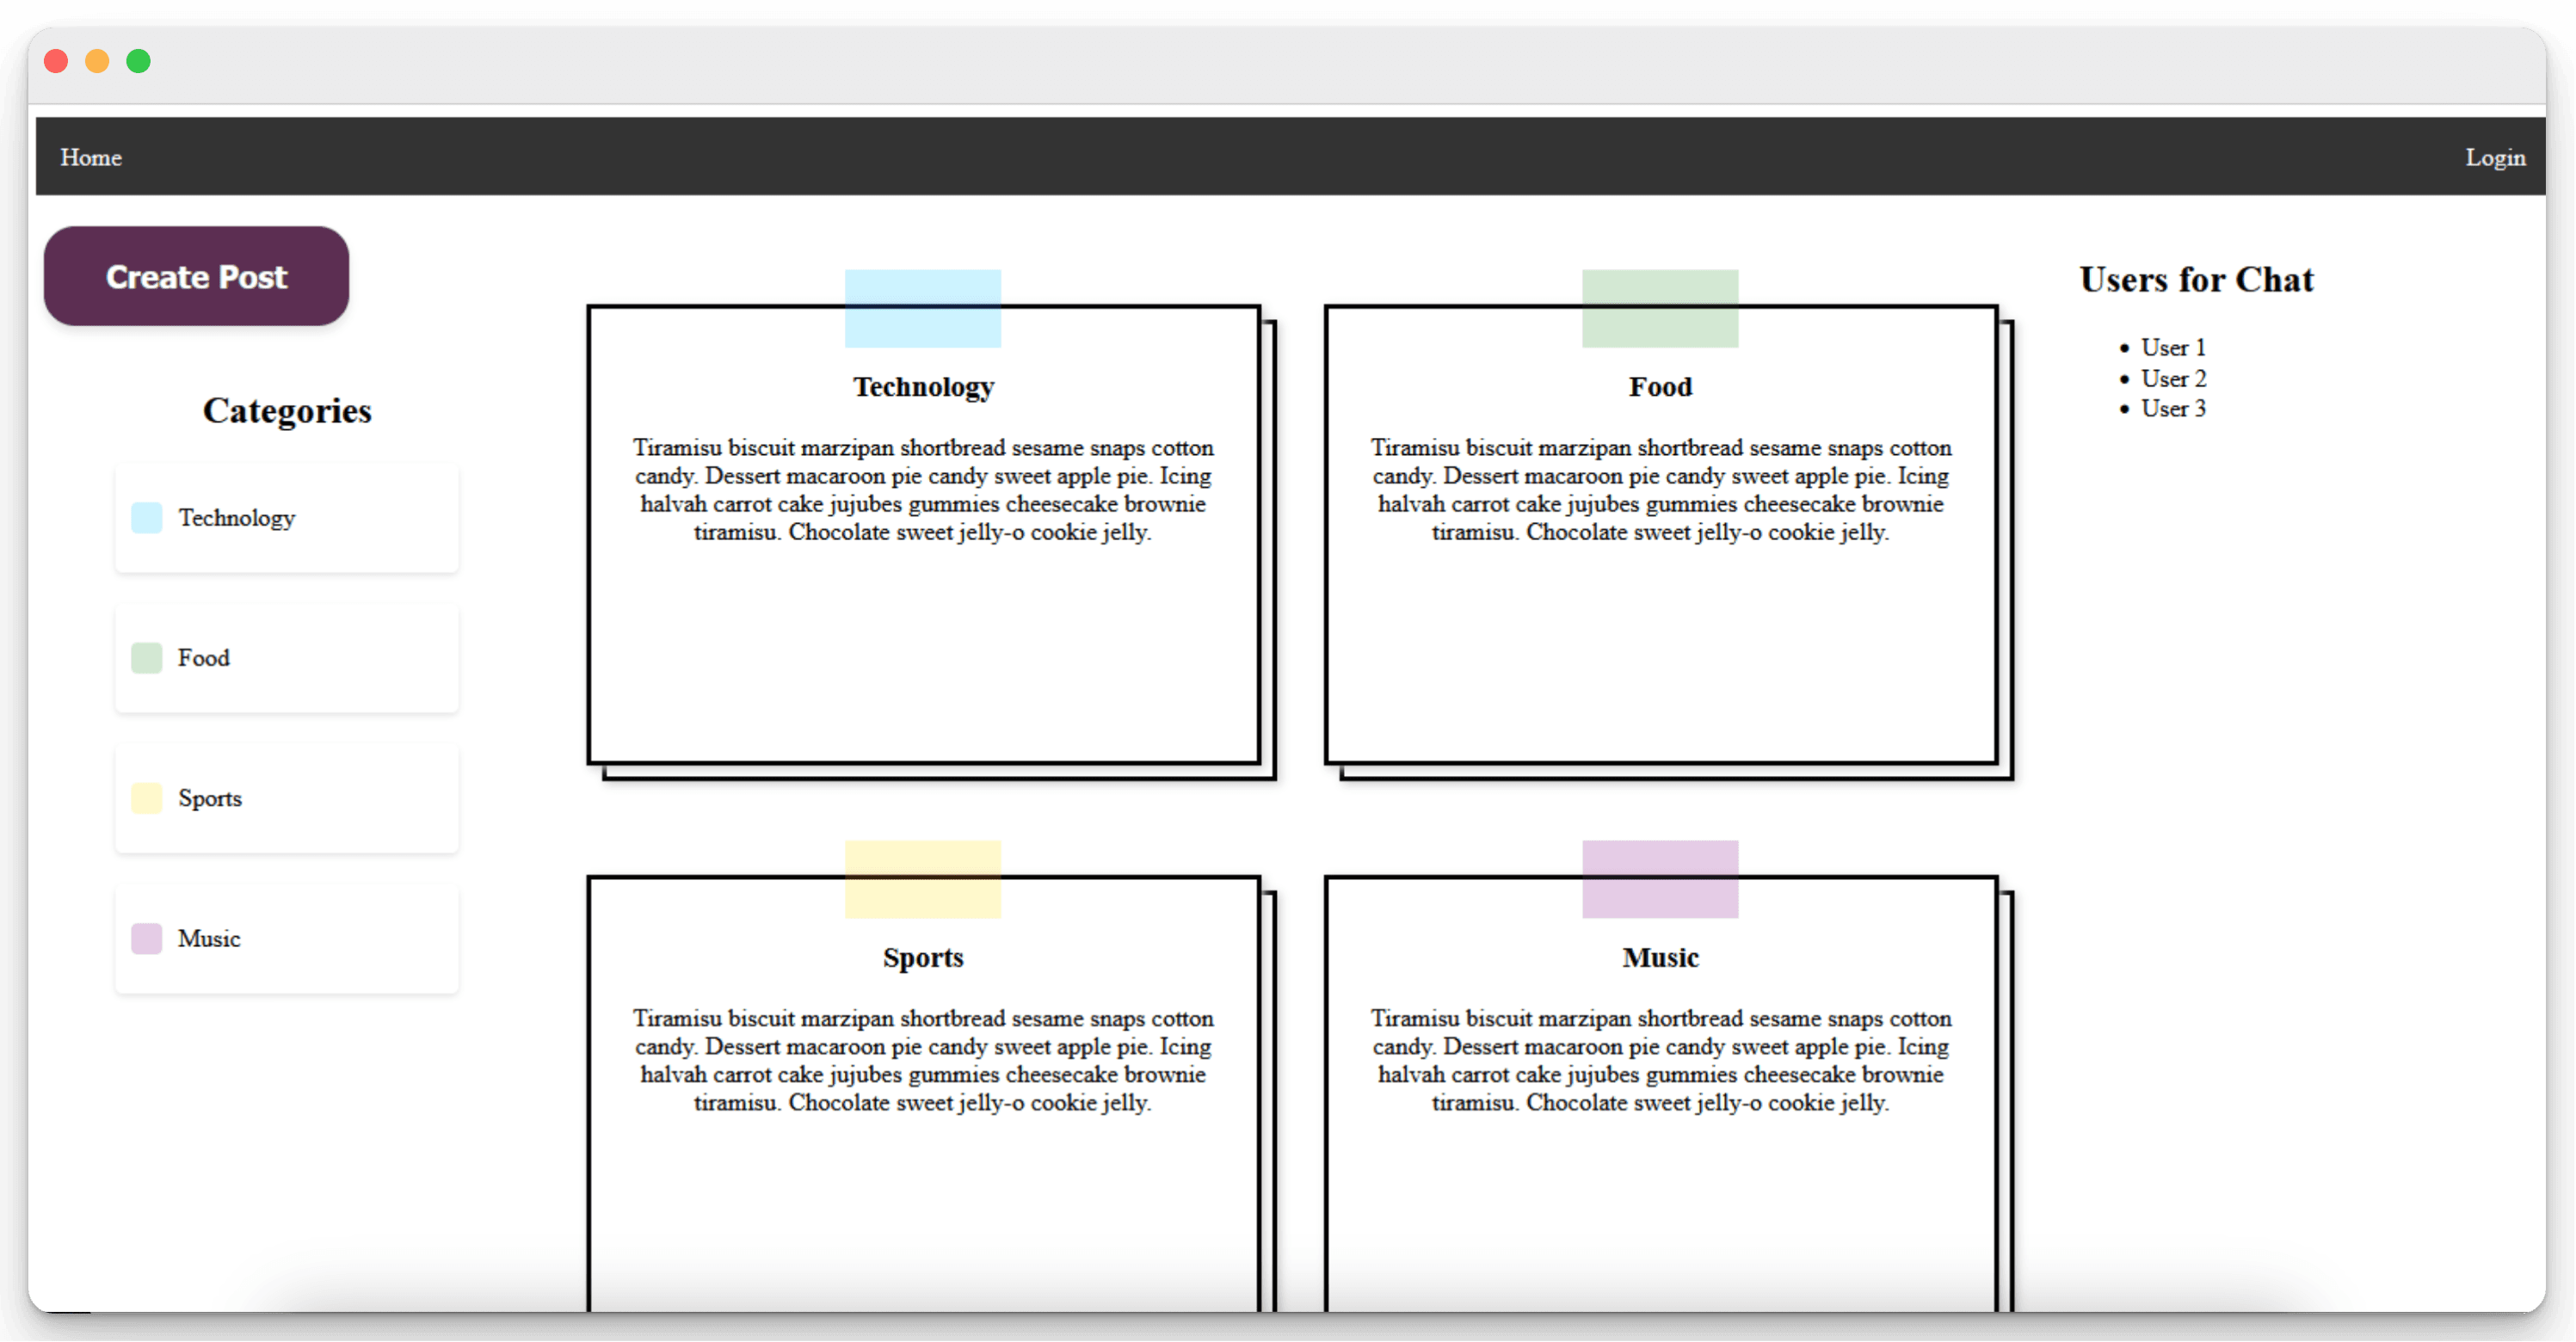
After some reflection, I came up with a creative solution to display categories in the UI as post-its with a sticky tape attached to them. Although this idea was met with some scepticism from some members, I believed that having each post with a distinctive coloured tape would add a visual element to the user interface while also making it easier to navigate and find content. After this proposal was accepted, we moved forward with the design.
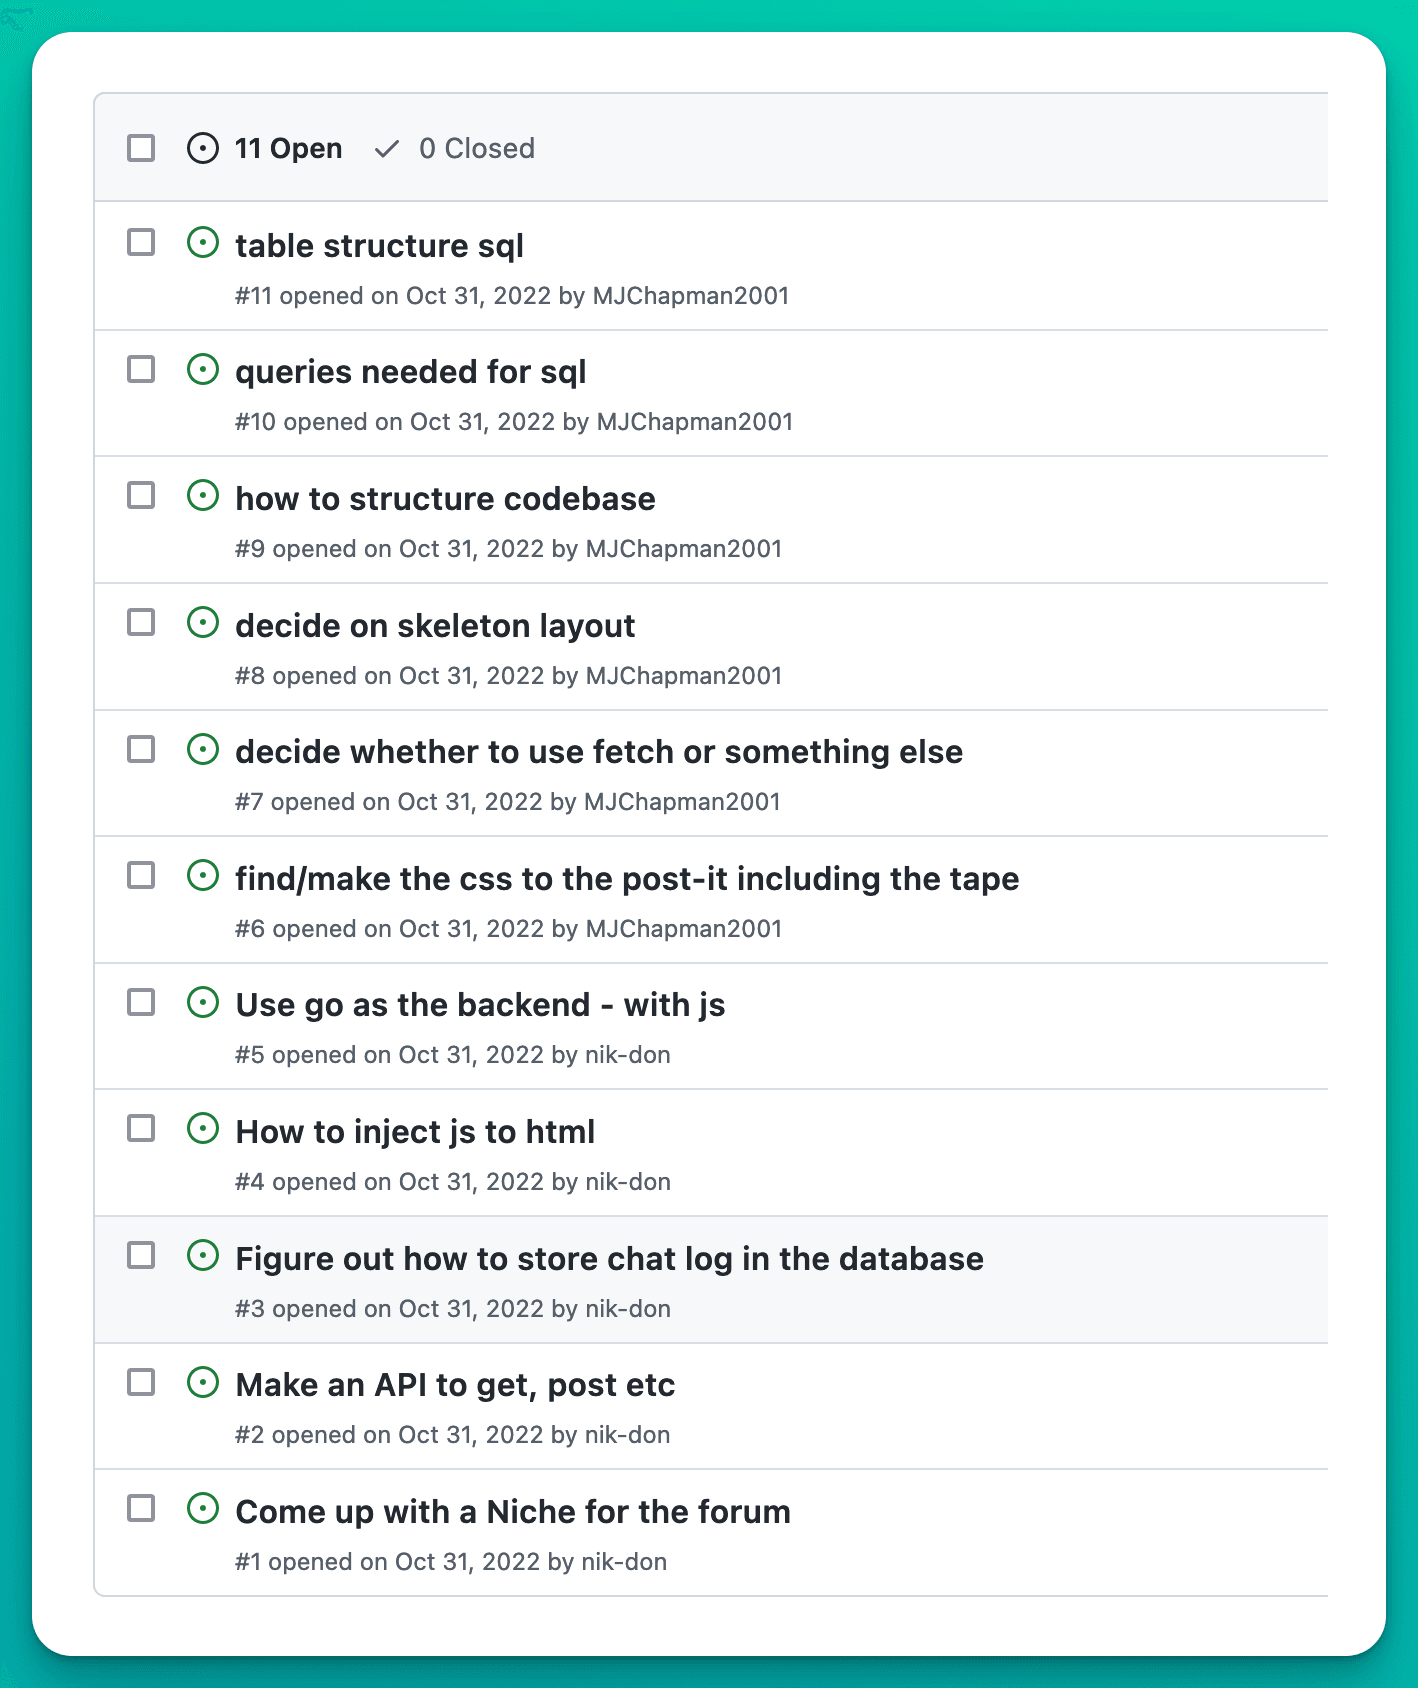
Having worked with Github before, I wanted to share my knowledge and suggest different workflows we could use. Once we had established Github as our platform of choice, we decided to create Github issues. These were specific tasks that needed to be completed, and everyone was assigned to them according to their comfort level or interest in researching.
Navigating Team Challenges and Go-ing Solo
During our project, we encountered several communication challenges despite setting up clear guidelines and a Discord channel for updates. These challenges led to occasional misunderstandings and delays.
A personal situation prevented me from participating in physical check-ins, adding another layer of complexity to our communication efforts. Despite my eagerness to collaborate and share knowledge, these factors eventually led to the team deciding to disband.
Rather than viewing this as a setback, I saw it as an opportunity to work independently. This shift allowed me to deeply engage with relearning Go syntax and problem-solving techniques. Fortunately, being part of the 01 Founders (opens in a new tab)community, which emphasizes a peer-to-peer learning model, I could still reach out to colleagues for feedback and advice, providing valuable support as I continued the project solo.
Reflecting on this experience, I realize I could have proposed several solutions to improve our situation. For instance, we could have sought more structured coordination despite the communication challenges. However, frequent check-ins were impractical, and I was already taking on a leadership role.
One key request that wasn't followed was the need to keep a personal log of daily work to ensure accountability and clear communication. Drawing from Tiago Forte's example (opens in a new tab) of failed top-down knowledge management, I see parallels with our situation. Forte explains how a company once attempted to create a knowledge base by mandating employees to share their knowledge, but it failed because people need proper incentives and organic processes to share information effectively. Similarly, our top-down communication methods didn't work because they didn't account for individual challenges and natural workflows.
Ultimately, this project taught me that even well-intentioned processes can fall apart when team members aren't fully committed. Our initial top-down communication approach didn't fully account for individual challenges and natural workflows, contributing to our difficulties.
This experience has highlighted the importance of flexibility and the willingness to adapt in both individual and team settings. By embracing these lessons, I feel better prepared for future collaborative efforts and personal projects alike.
Embracing Clean Code Principles and Planning Ahead
At the start of the project, I coincidentally picked up Robert C. Martin's (opens in a new tab) book "Clean Code," which proved to be an invaluable resource. The analogy of designing a dog house versus an actual house struck a chord with me and emphasized the importance of well-organized and well-designed code.
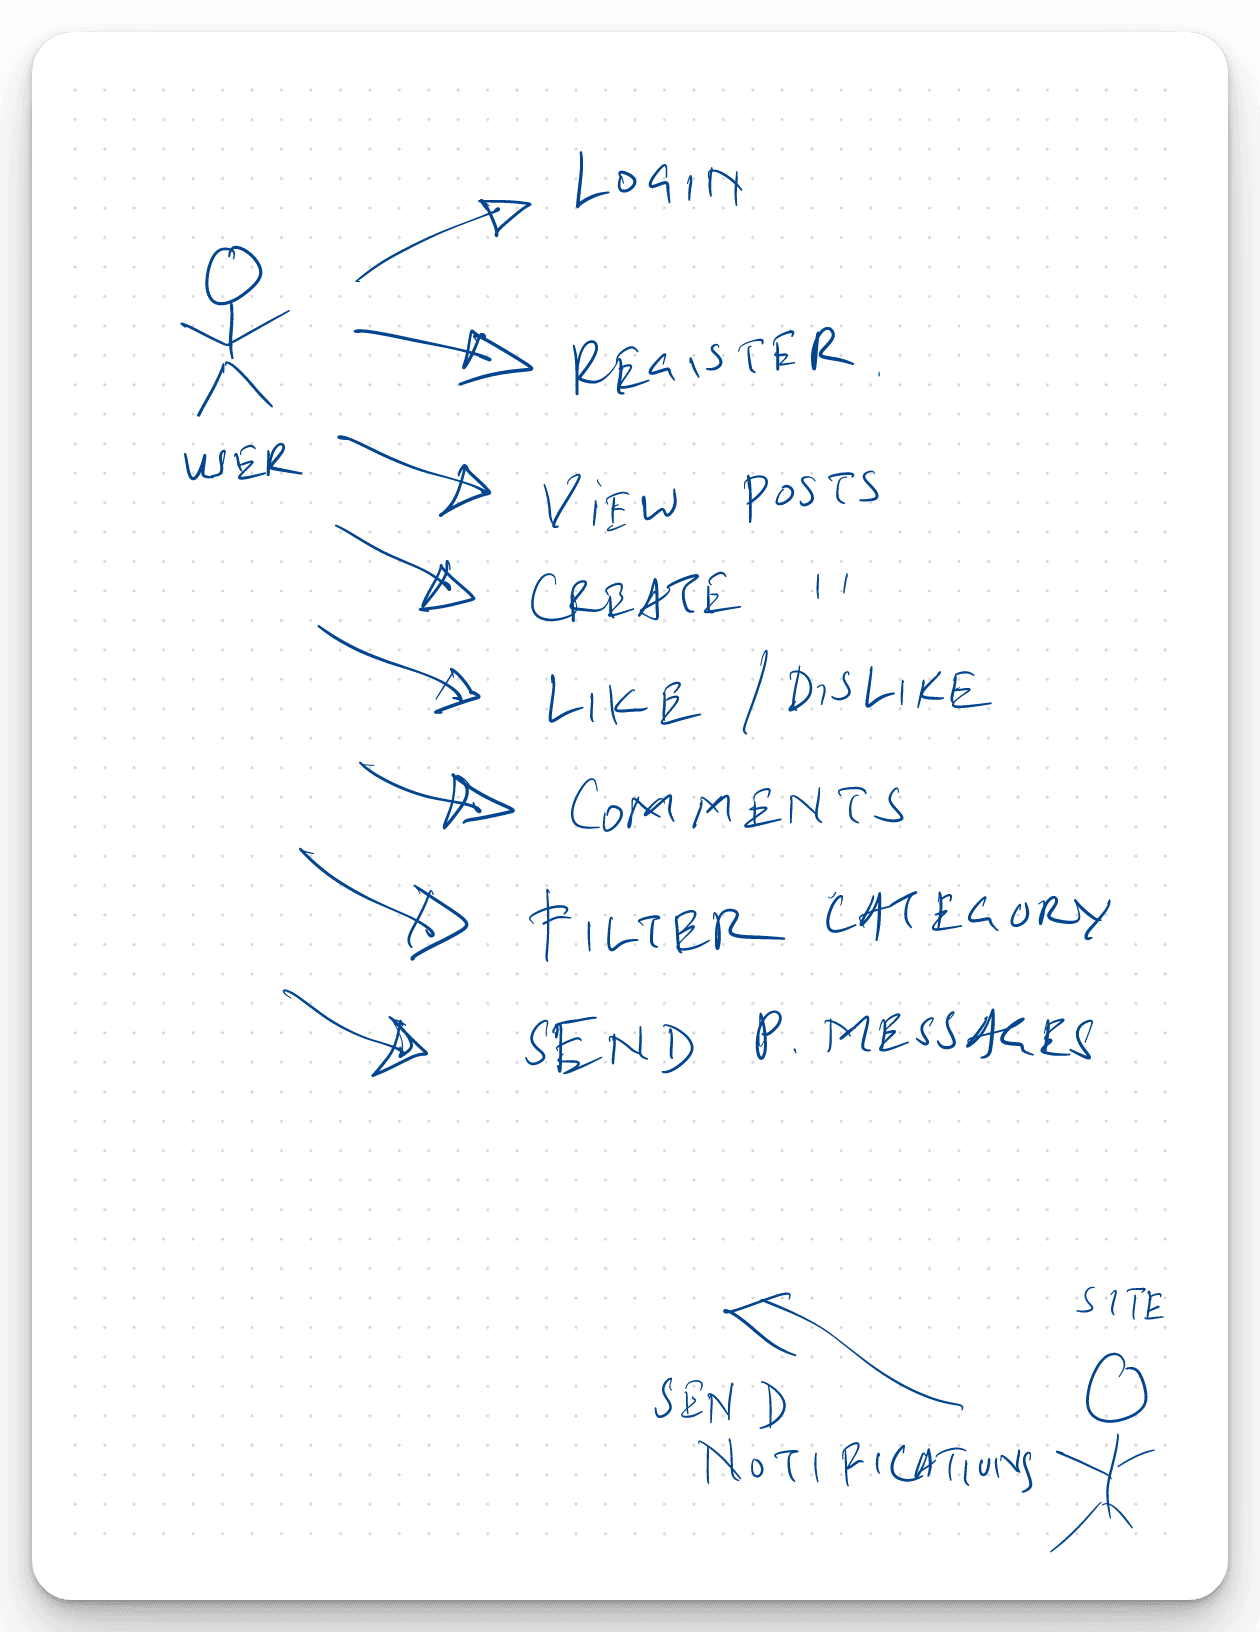
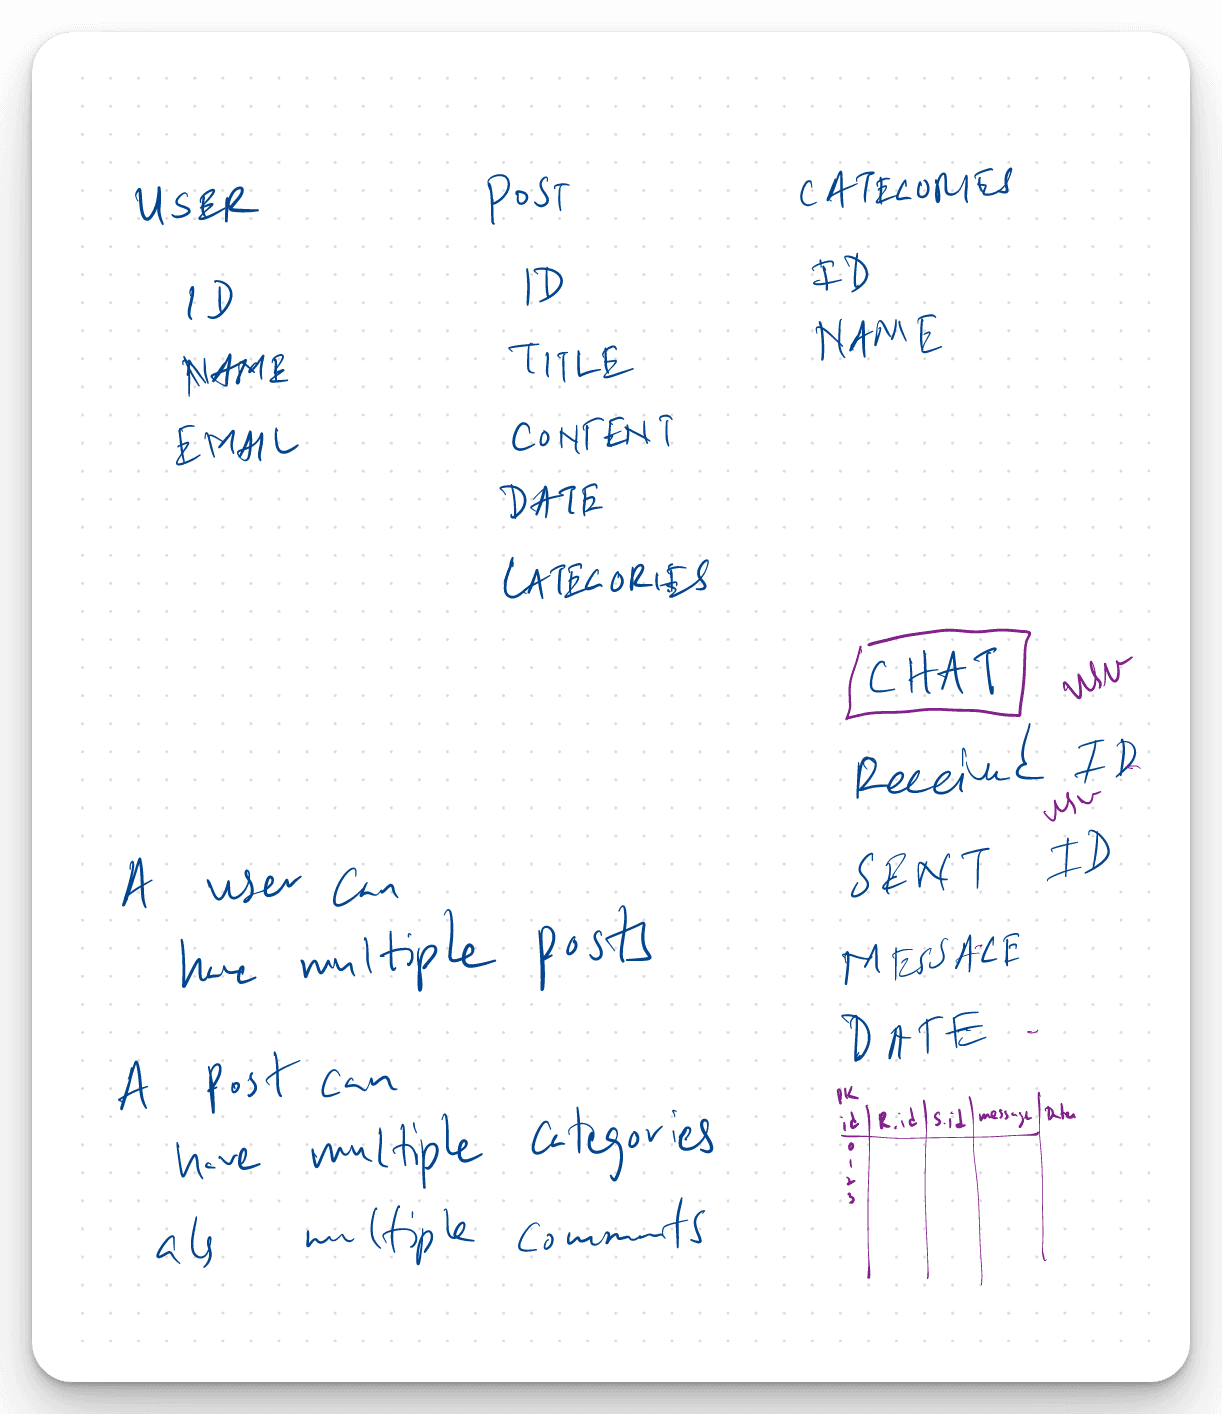
To start, I created a small UML diagram outlining all the possible user actions and had a rough plan for the database schemas.
Project structure
From the beginning, I was aware that one of the significant challenges would be to structure the project in a way that would enable smooth development as the codebase grows. Therefore, it was crucial to ensure that the scaffolding was done correctly to avoid potential issues with adding functionality and maintenance in the future.
After going through numerous posts and talks, I was able to pick and choose some layout patterns used in the Go ecosystem to come up with an initial project structure that, I felt, would work best for this particular project. Although it took me longer than expected to settle on the final structure, I believe that the effort paid off in the end.
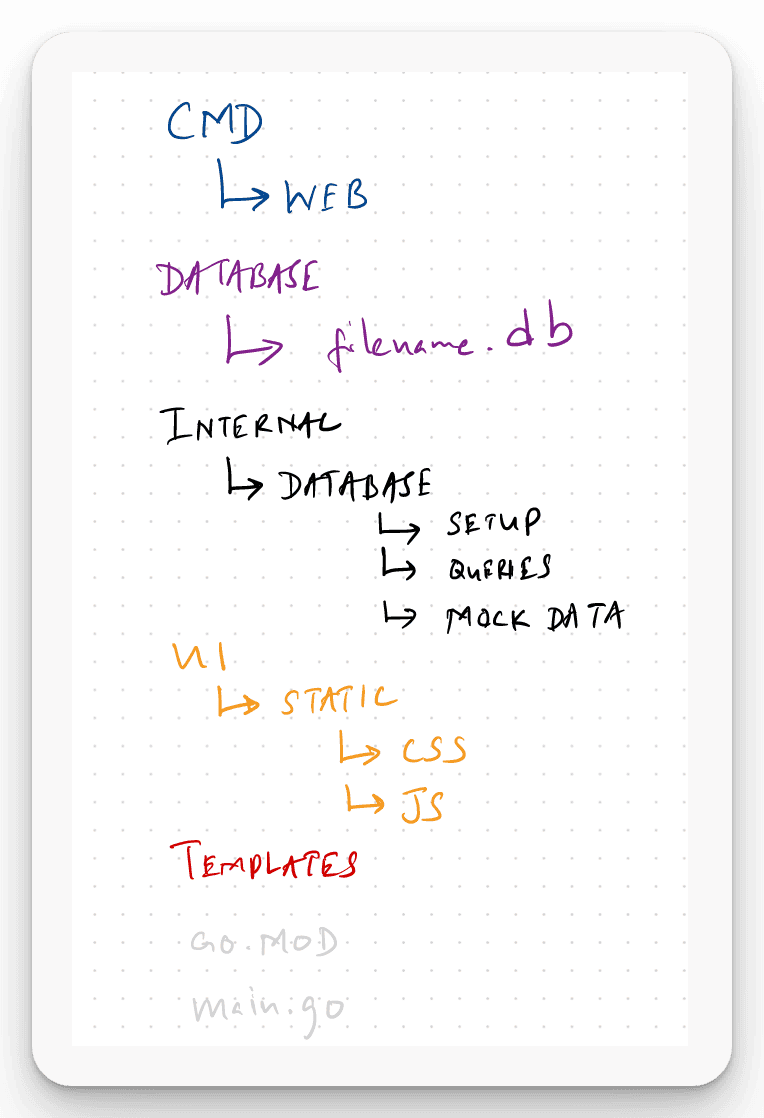
| Directory Name | Subdirectory | Description |
|---|---|---|
| cmd | web | Contains web handlers and server code |
| database | - | Store SQLite db file |
| internal | > | Private code |
| auth | For all related to authentication | |
| database | For all related to db (initialize, queries) | |
| session | For all related to user sessions | |
| pkg | > | Public library code, code that can be re-used |
| ui | static - assets - css - js | Frontend related |
| templates | Single html file served via Go | |
| .gitignore, go.mod, go.sum, prettier.config.js |
While the project itself may not have sounded overly complex, the idea of using Go to build a single-page web app seemed both intimidating and straightforward at the same time.
On one hand, I had prior experience with Go and was familiar with its syntax and capabilities, which made me feel confident in tackling the project. However, the thought of each page being rendered with one html file seemed daunting.
One of the key decisions I made early on was to store the web handlers and server code in a sub-directory called web. This decision was made to keep the project structure clean and organized and to ensure that the different components were easily identifiable and accessible.
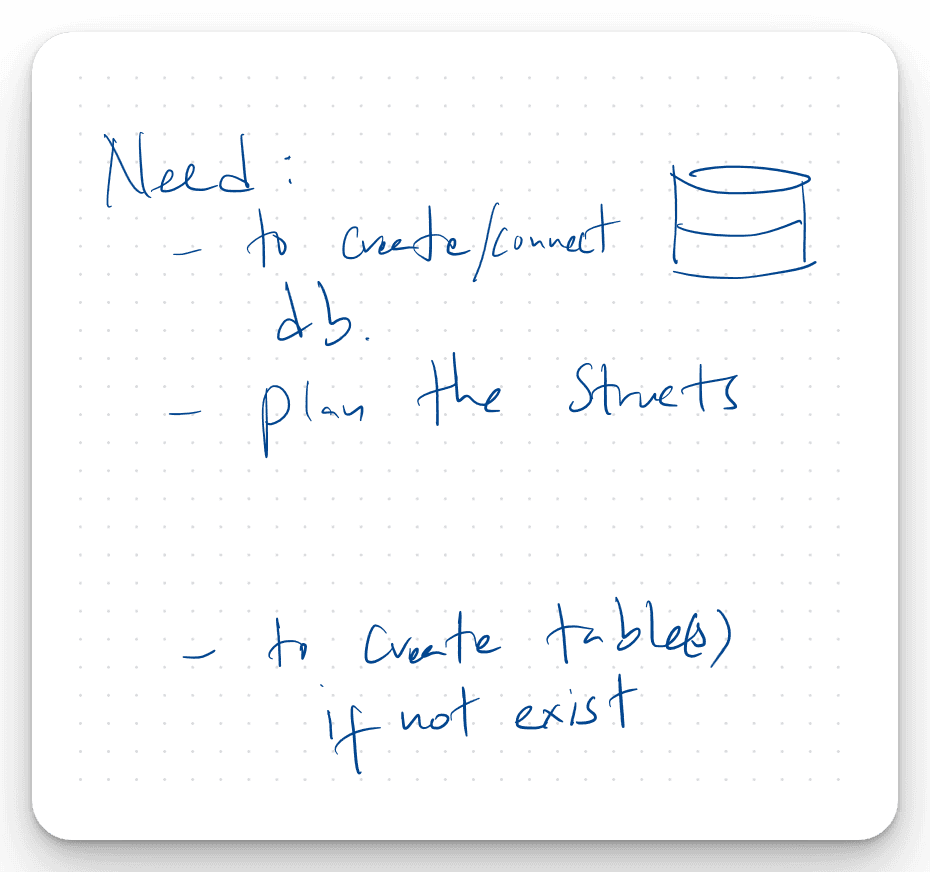
Breaking Down the Task
If we break down the task, it seems relatively straightforward:
- Run the server (using the ServeMux - http package)
- Set up the database
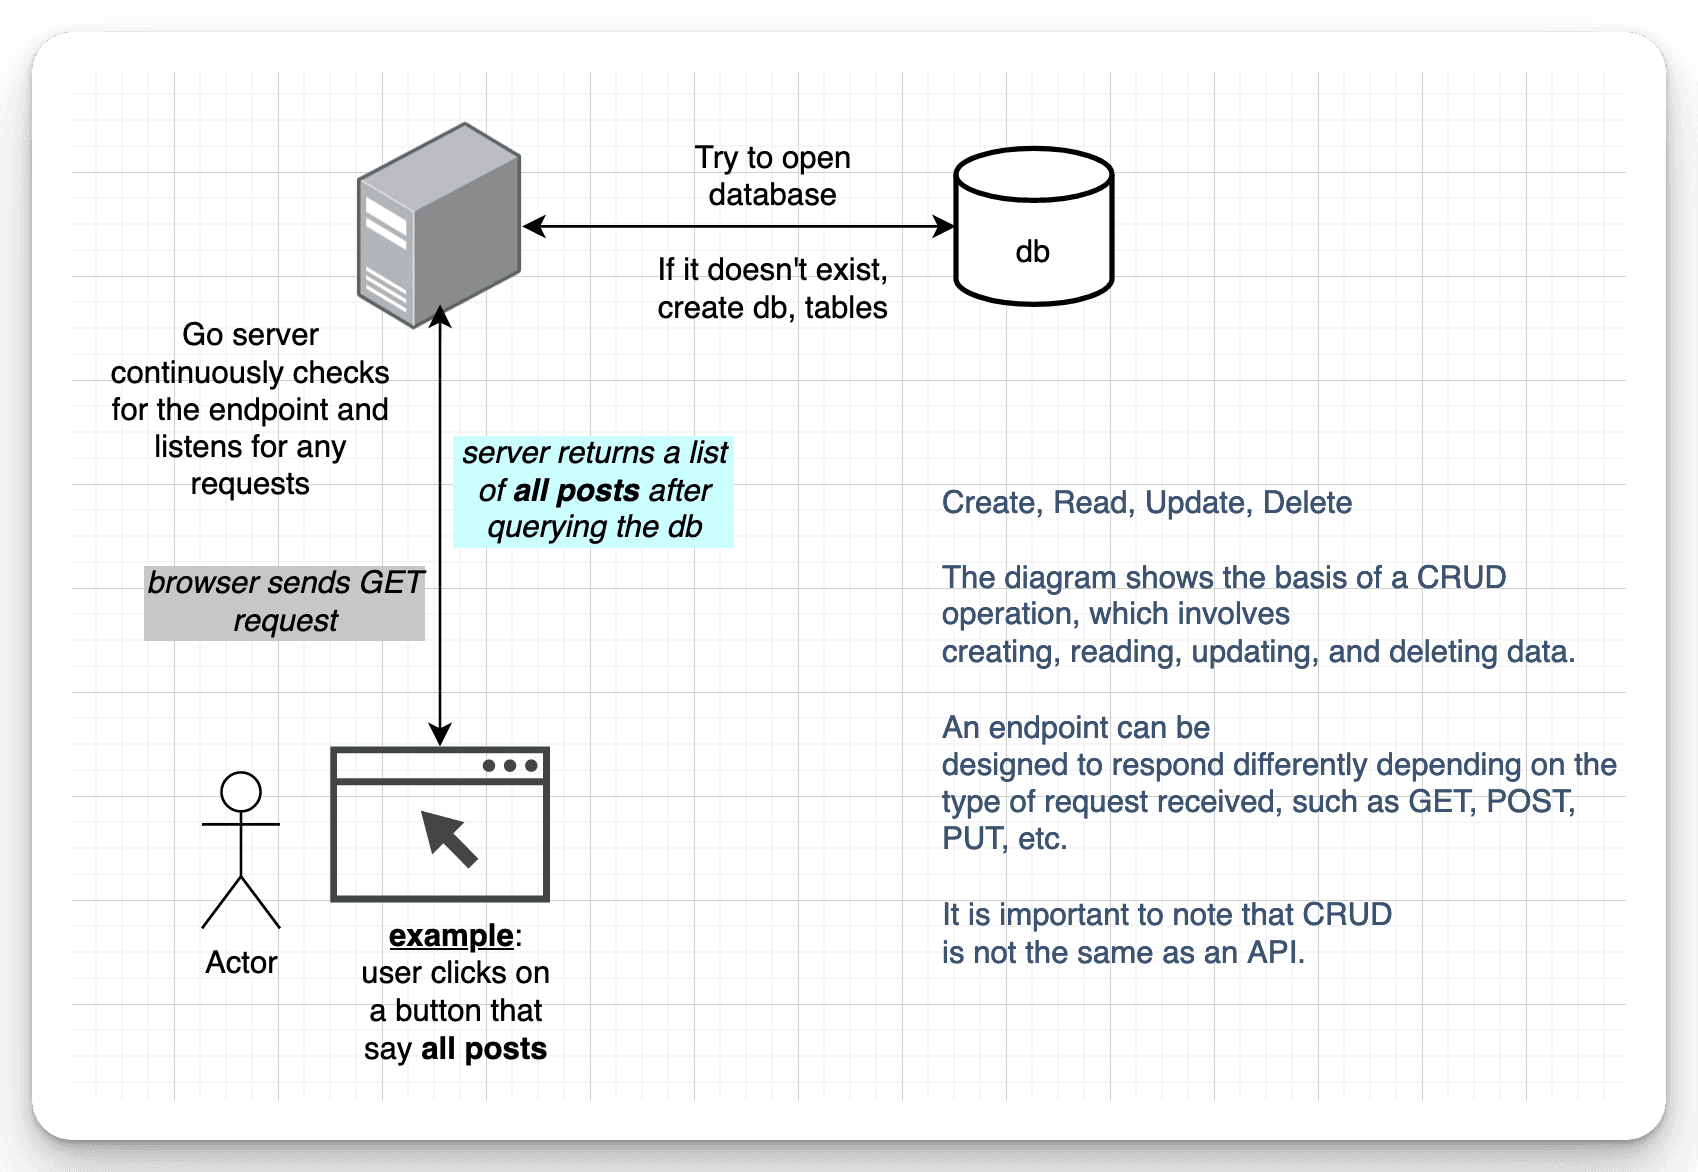
Once these initial steps are complete, the user can hit various endpoints, and the server will handle the requests accordingly, whether it's a GET or POST request. The server will then respond by displaying the appropriate changes in the user's browser.
ServeMux is a struct in the Go standard library that acts as a request multiplexer for HTTP requests. It matches the requested URL path against a list of registered patterns and calls the associated handler for the first matched pattern. The ServeMux allows multiple handlers to be registered for a given pattern, and the handlers are executed in the order they were registered. It is commonly used in Go web development for routing HTTP requests to the appropriate handler function.
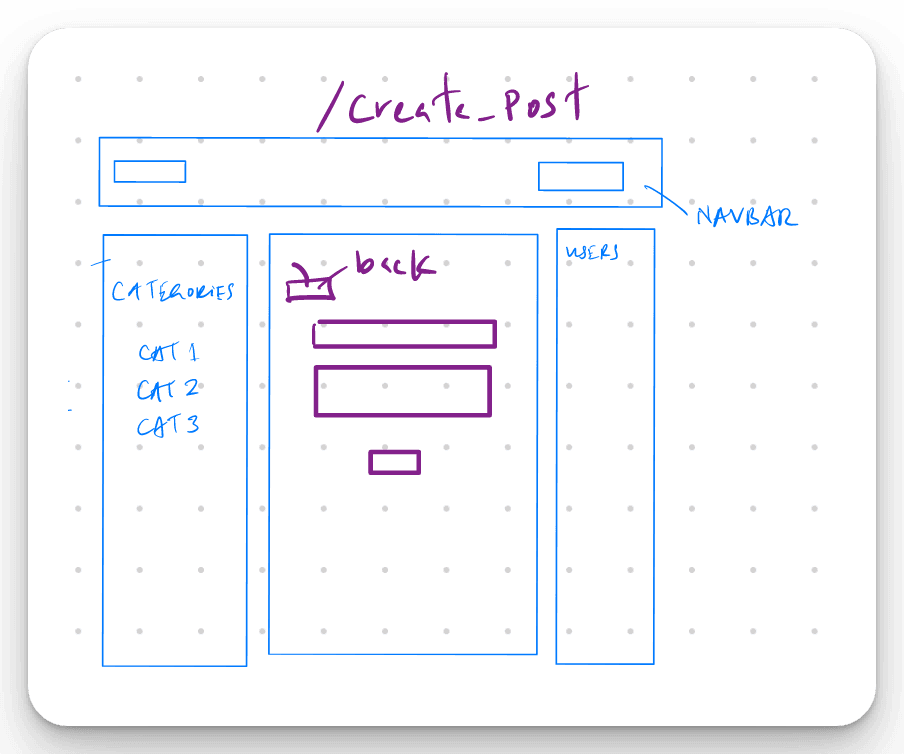
With the goal of creating a single page application, I began planning out the routes and endpoints needed for the project. However, this was not without its challenges, as it was difficult to predict every element that would be required. As a result, careful consideration was given to ensure that the layout could be adapted and expanded upon as the project progressed.


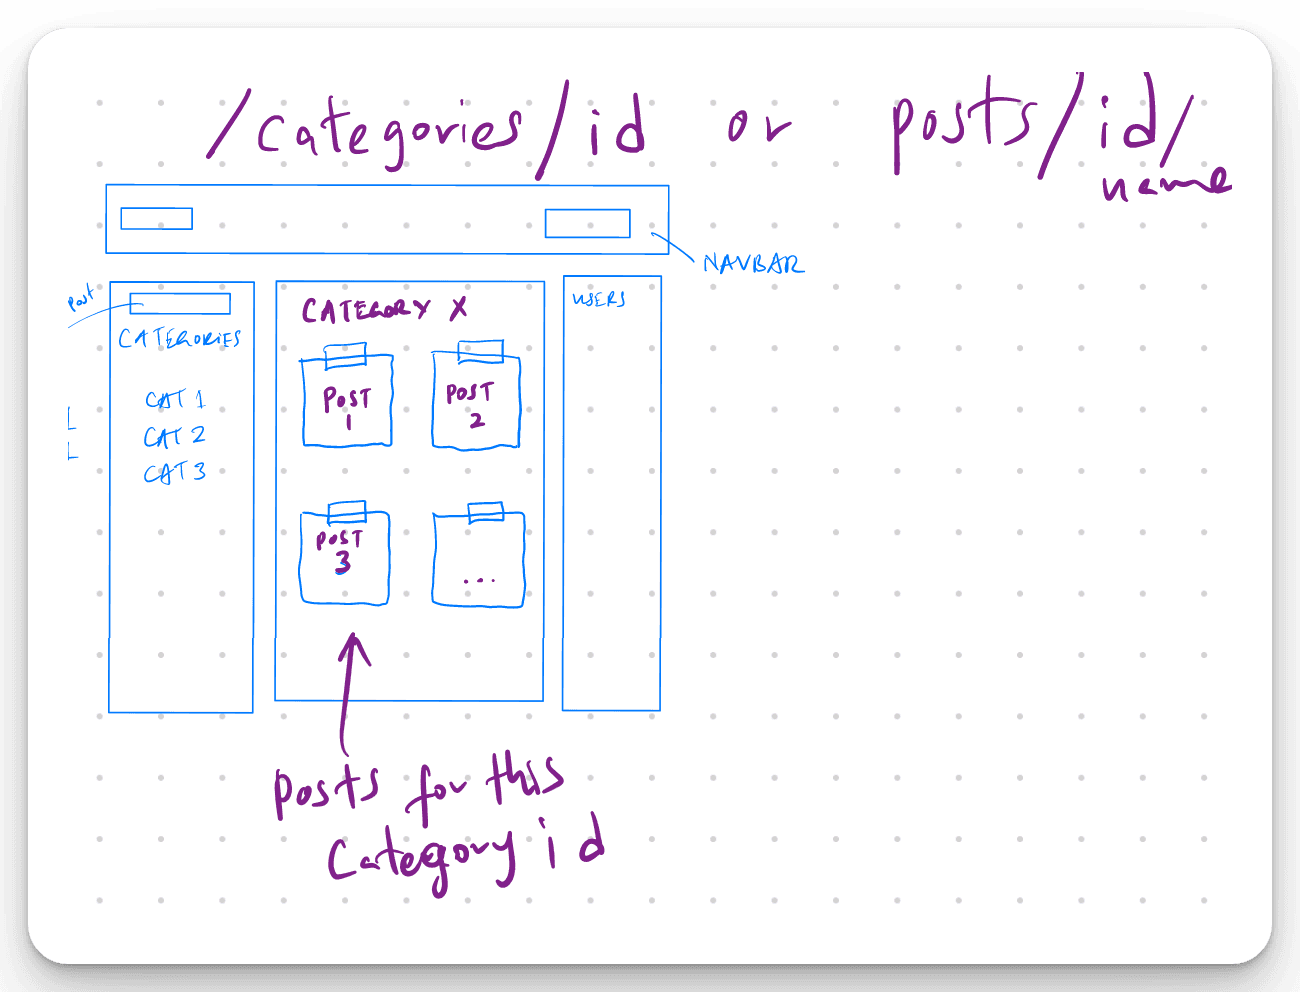
As I began working on the database schema for the project, I realized it required more consideration than I initially expected. Determining the necessary tables to support the forum's various functionalities is not straightforward. Additionally, requirements might change over time, requiring adaptations to the schema, which might not become apparent until later.
A user could have multiple posts, and a post could belong to multiple categories. Additionally, each post could have multiple comments associated with it. These relationships show the basic idea of the tables needed for this project.
Although it was tempting to work on all the functionalities simultaneously, I decided to focus on the login, post creation, and commenting features first. I set the chat functionality to the side, for now, to ensure that the essential functionalities were completed before moving onto other components.
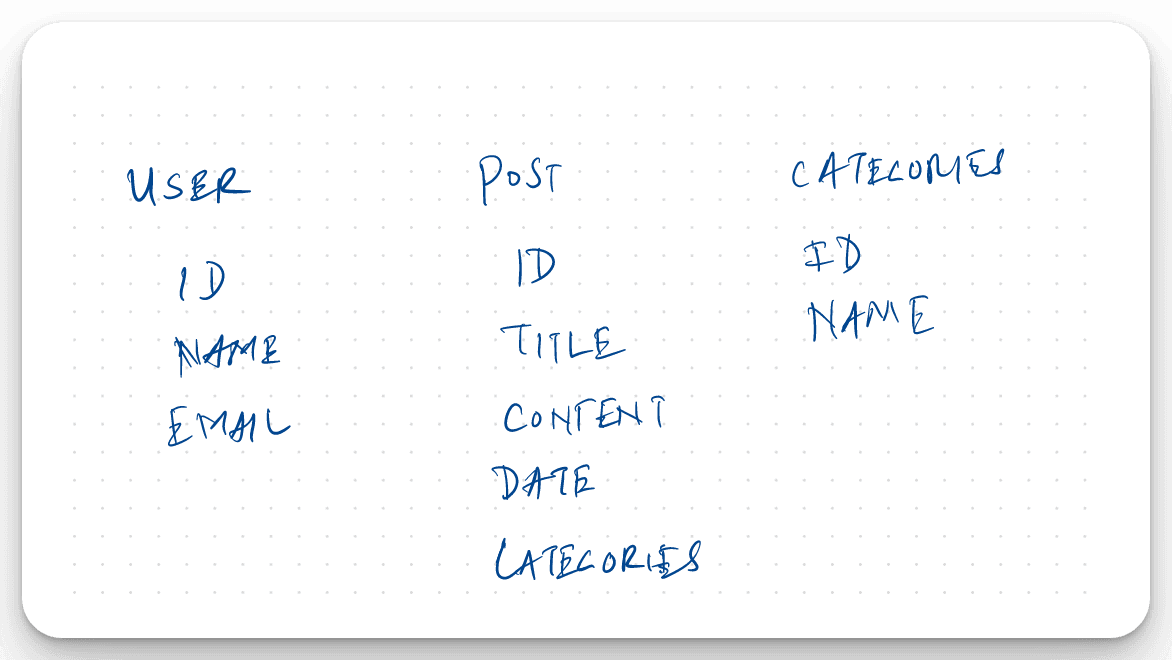
As I previously mentioned, it can be challenging to determine the necessary fields and data types for a database table, including identifying foreign keys, especially when starting a project. Understanding best practices in this area is crucial, particularly for beginner developers. It's essential to continuously iterate and refine the database schema throughout the development process. As new features and functionalities are added to the project, the schema may need to be modified or expanded to accommodate them. This ongoing refinement ensures the database structure remains robust and adaptable.
Tools like ERDs (Entity-Relationship Diagrams) can be useful in visualizing the database schema and identifying any potential issues or inefficiencies.
As you might have noticed, I've been using singular table names for the database, which several developers recommended as a best practice.
The rationale behind using singular table names is to maintain consistency and make the schema easier to read and understand. By using singular table names, it's immediately clear that each table represents a single entity, and the relationship between entities is reflected in the foreign keys.
However, it's worth noting that there are differing opinions on whether to use singular or plural table names. Some developers argue that plural table names are more intuitive since they represent a collection of entities. Regardless of which naming convention you choose, consistency is key. Once you decide on a naming convention, it's essential to stick to it throughout the project to avoid confusion and maintain a clean and organized database schema.
Preparing the Groundwork
When I decided to resume this project after putting it on hold for a while, I knew that time was of the essence. I planned to create a bare-bones version first and add the styling later. However, despite my intentions, I couldn't resist the urge to spend more time on styling.
To kick off the project, I started working on user authentication with sessions. However, as I had not worked with GO in a while, I felt it was necessary to brush up on my skills before proceeding. To achieve this, I revisited Alex Edwards' book (opens in a new tab), which proved to be an excellent refresher. I spent a considerable amount of time reading and grasping the concepts, and I felt that I understood them better than the last time I had read the book.
Following the principles outlined in the book, I set up the server:
package web

import (
  "net/http"
)


func RunServer() {
  port := "3000"
  addr := ":" + port

  /* Initialize a new http.Server struct. We set the Addr and Handler fields so
  that the server uses the same network address and routes as before, and set
  the ErrorLog field so that the server now uses the custom errorLog logger in
  the event of any problems. */
  srv := &http.Server{
    Addr:     addr,
    Handler:  Routes(), //get the servemux containing our routes.
  }

  infoLog.Printf("Starting server on %s", srv.Addr)
  // Call the ListenAndServe() method on our new http.Server struct.
  err := srv.ListenAndServe()
}
Since Go's servemux treats the URL pattern "/" like a catch-all, all HTTP requests to our server will be handled by the home function, regardless of their URL path. For instance, visiting a different URL path like http://localhost:4000/foo (opens in a new tab) will result in the same response.
if a user visits / which is assigned to the Home handler.
the text/template" package is used will render a HTML template in the static folder.
The first endpoint I decided was for a user to be be able to register.
package web
import (
"net/http"
)
// Routes returns a servemux containing our application routes.
func Routes() *http.ServeMux {
mux := http.NewServeMux()
mux.HandleFunc("/", handlers.Home)
mux.HandleFunc("/user/register", handlers.UserCRUDHandler)
/* allows the server to handle requests for files in the ./ui/static/ dir
and serve them to clients when a request is made to the "/static/" URL path */
fileServer := http.FileServer(http.Dir("./ui/static/"))
mux.Handle("/static/", http.StripPrefix("/static", fileServer))
return mux
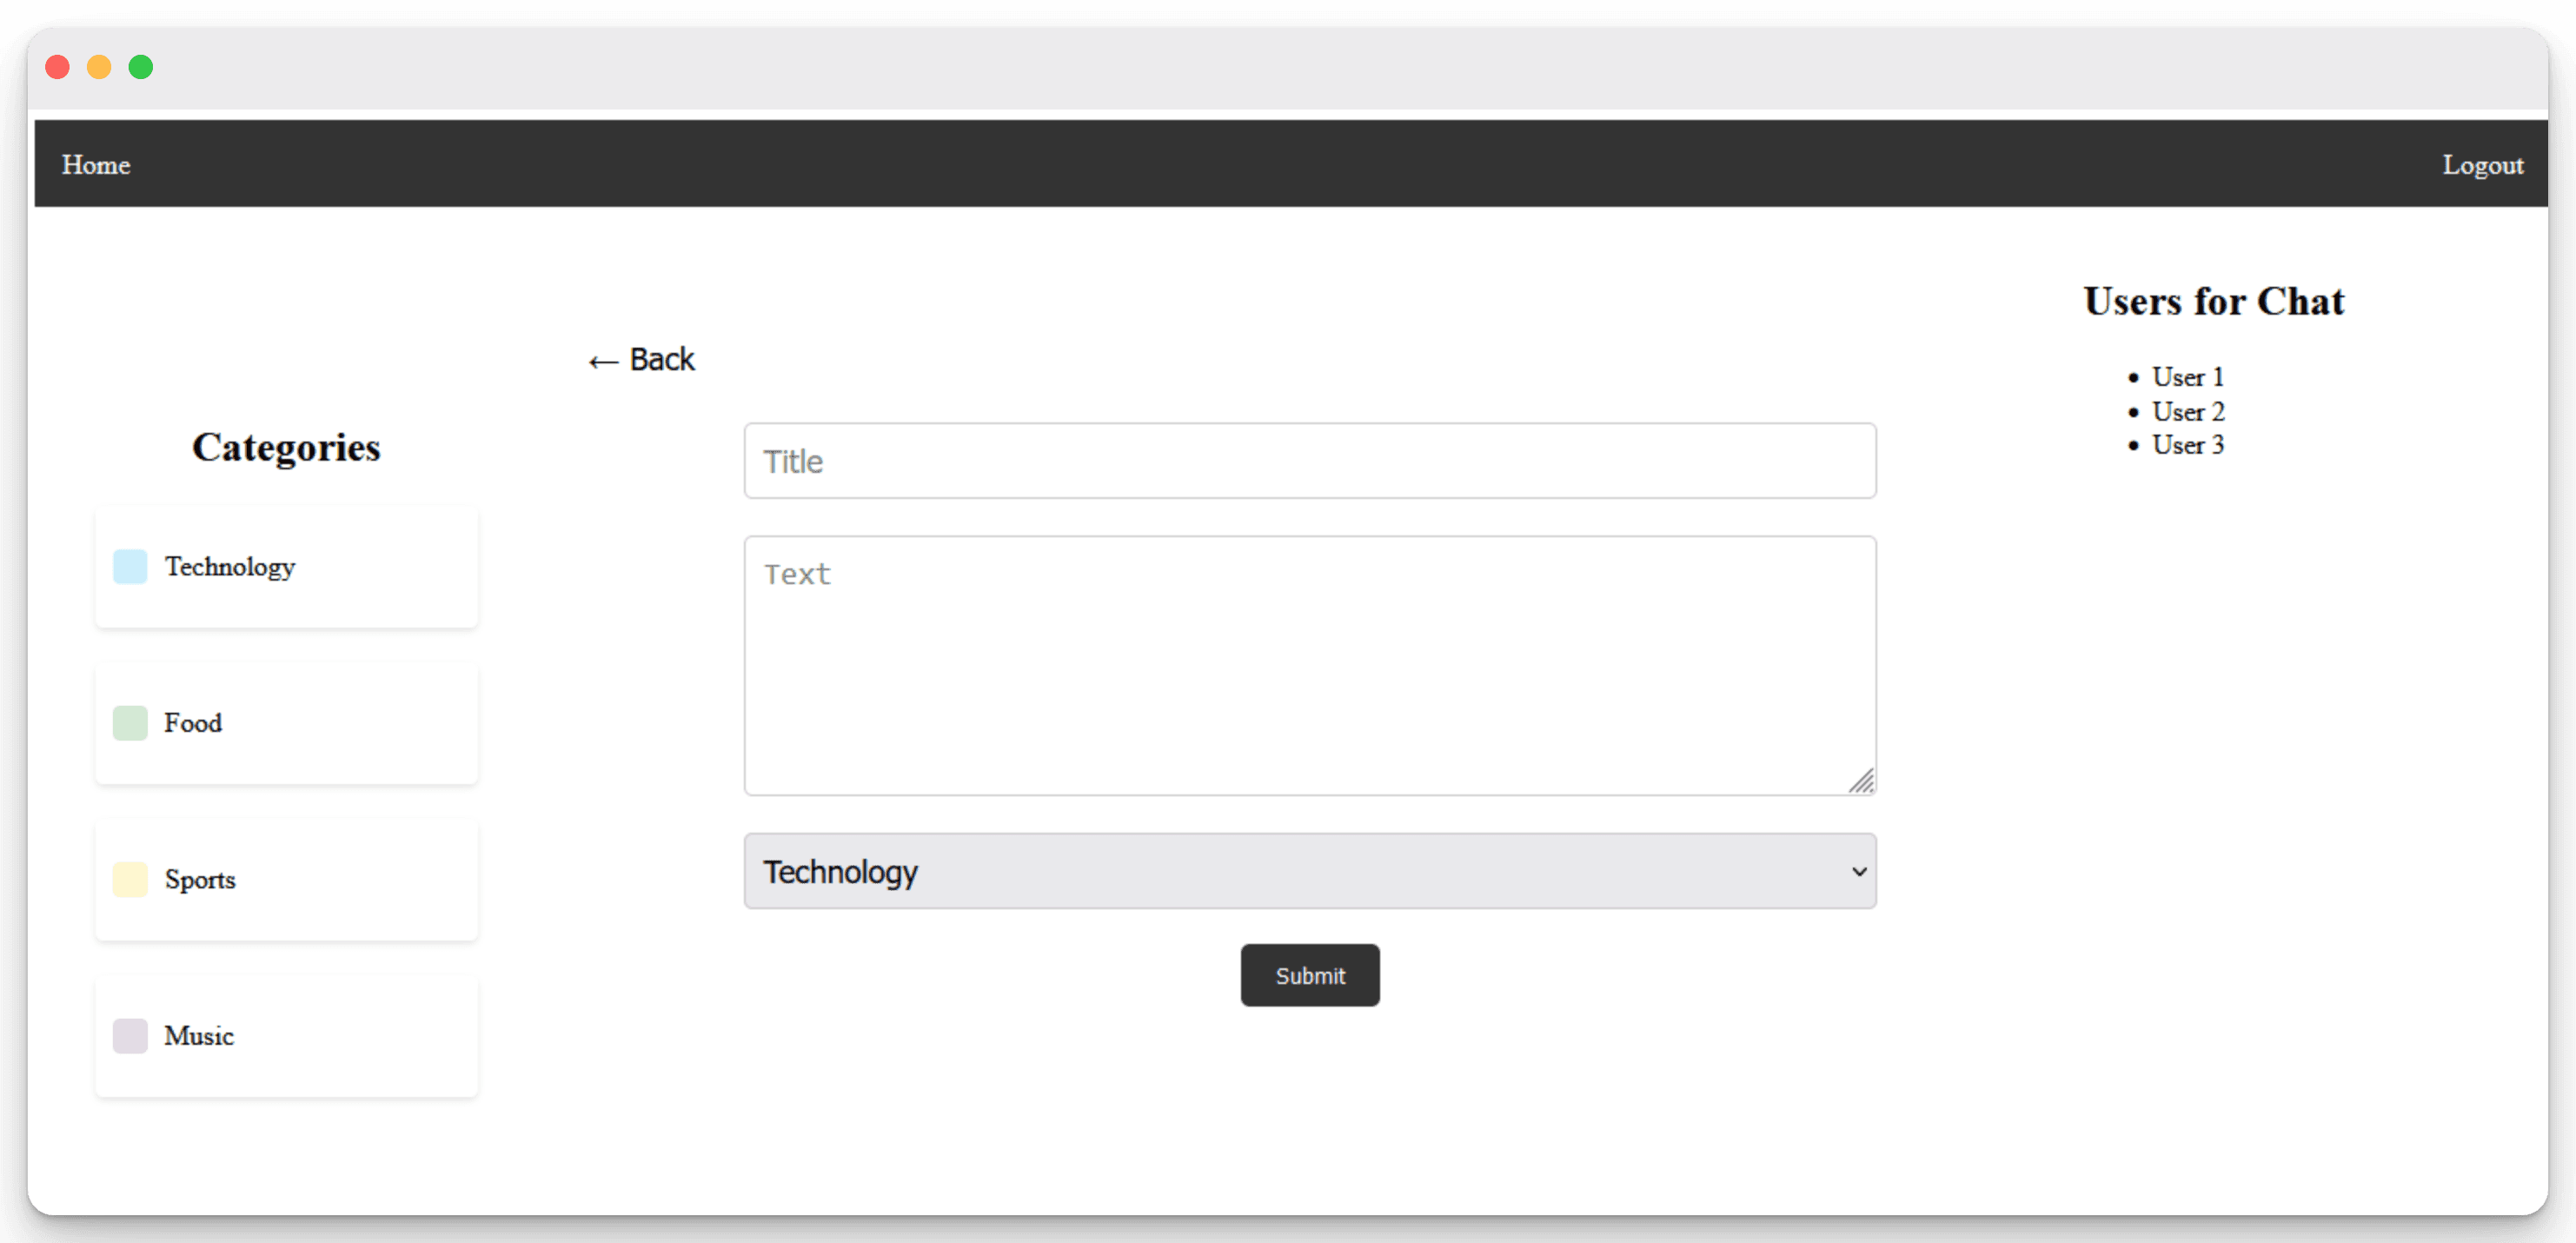
}Here is the initial base layout design using the gohtml template and some CSS. The design was simple and straightforward, with the aim of being expanded upon later.
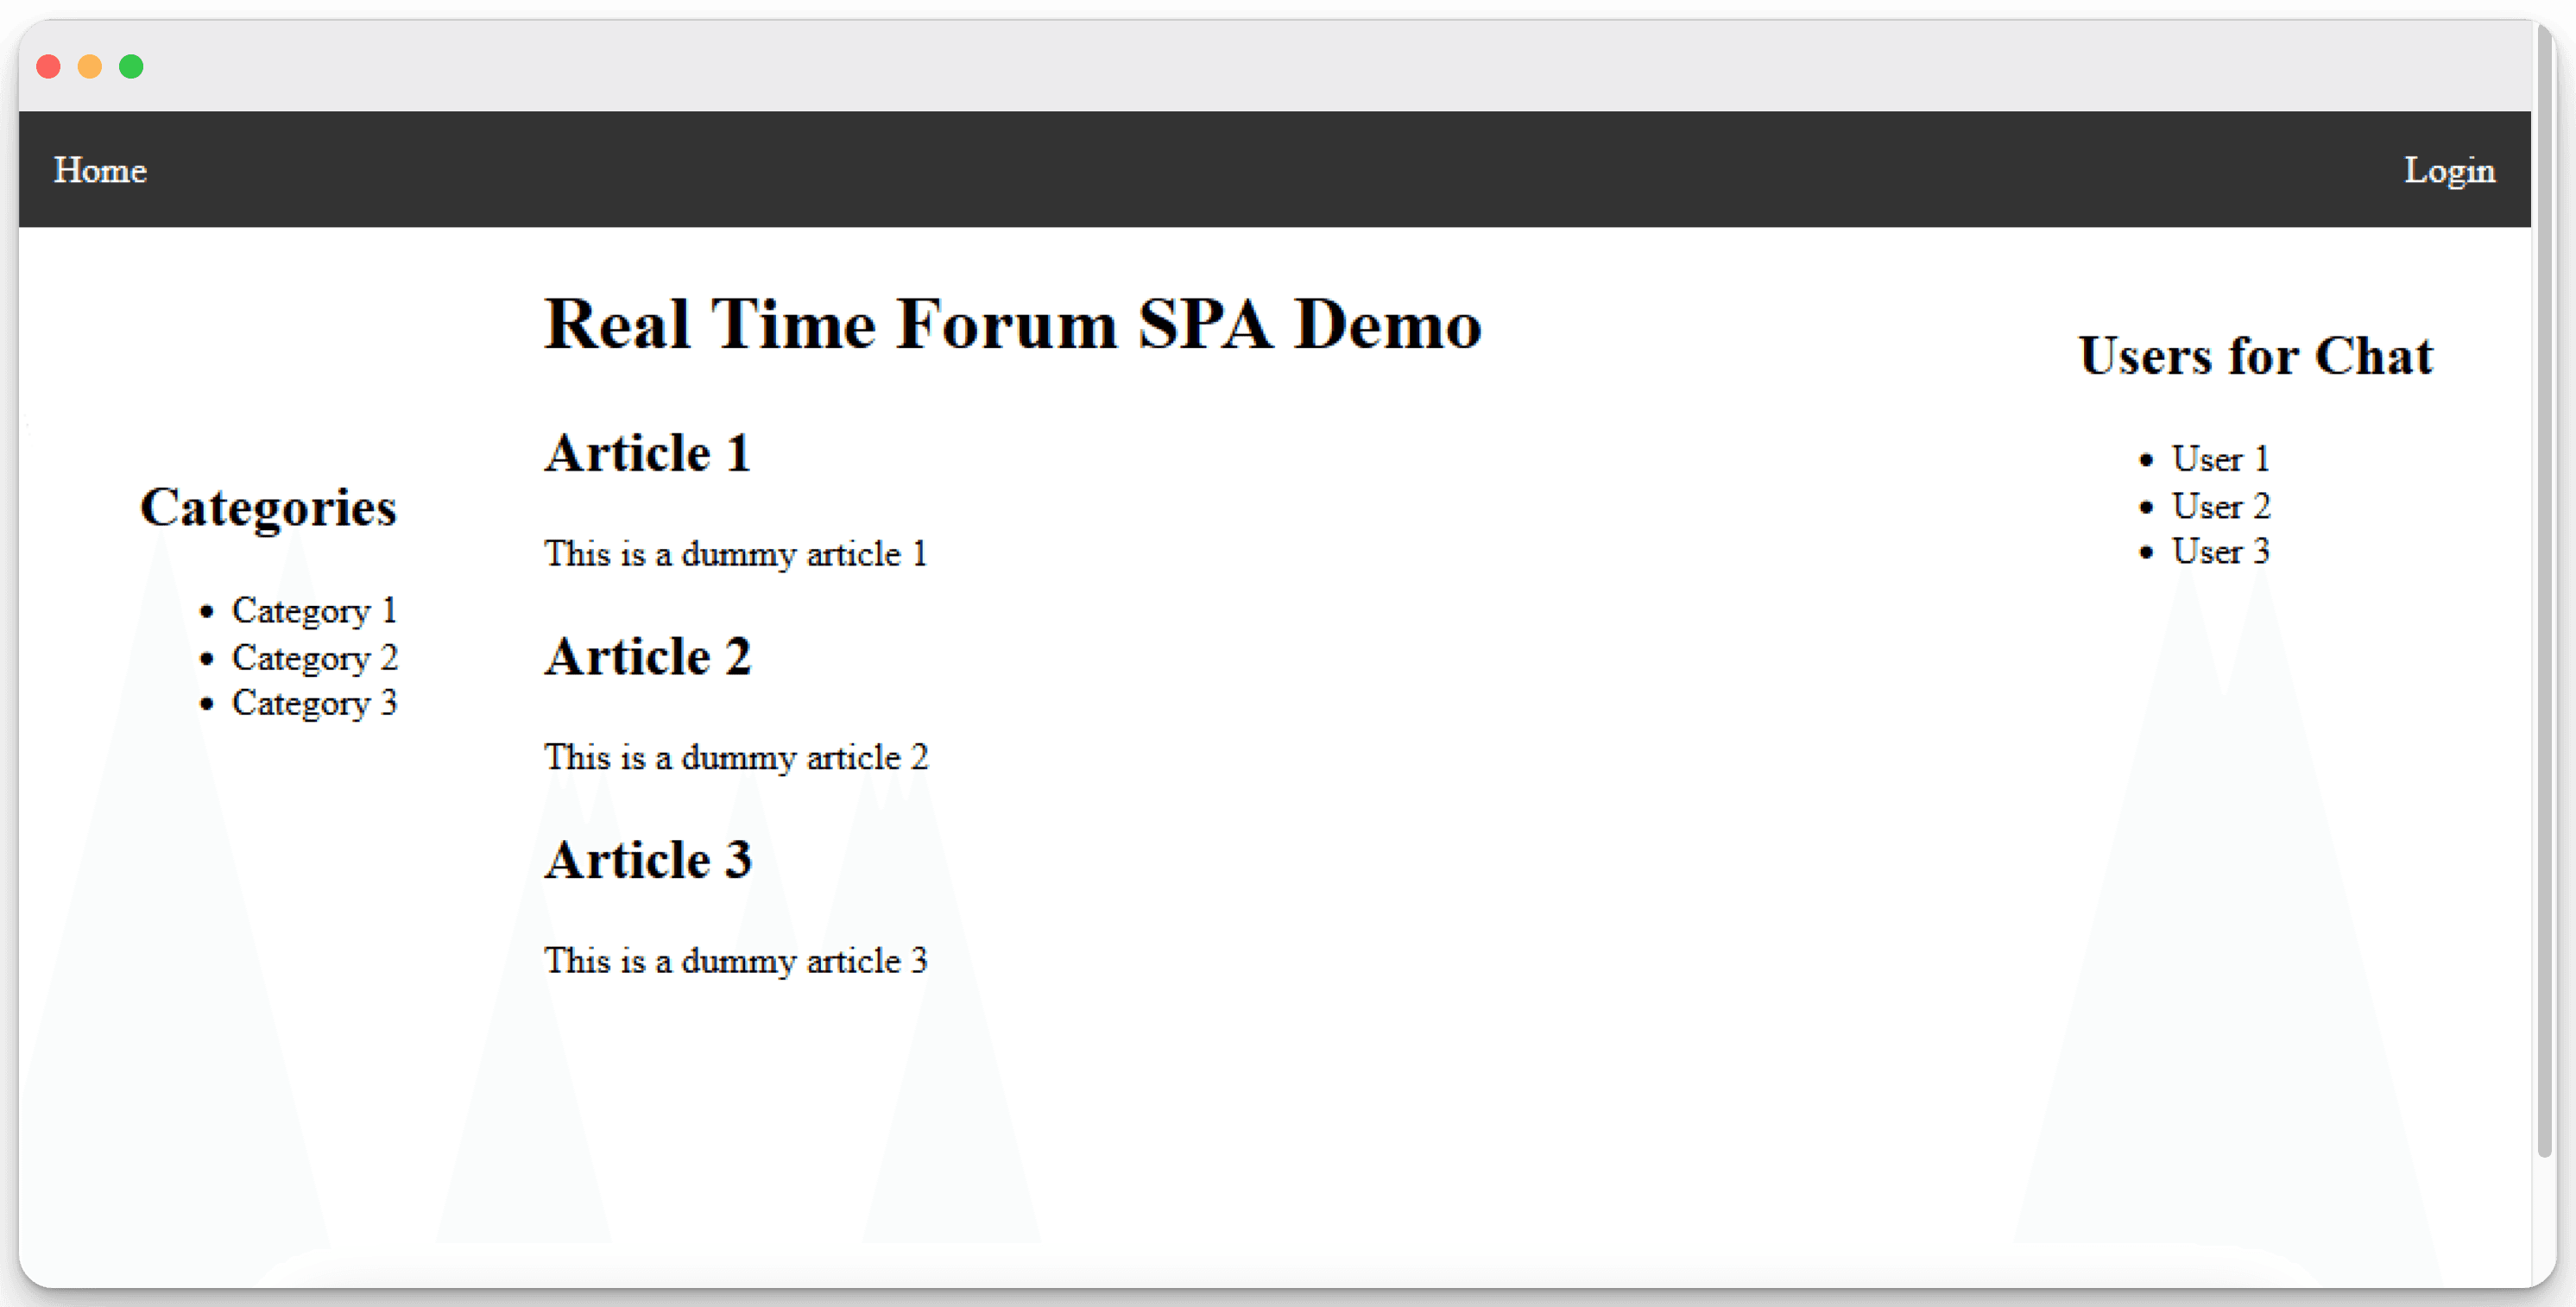
In hindsight, I could have taken a more structured approach and focused on the backend first, using a tool like Postman to verify that the routes were being served correctly before moving on to designing the layout. This would have allowed me to identify and address any issues with the server's functionality before moving on to the visual aspects of the site.
Setting up SQLite and Exploring Database Functionality in Go
As the project required using SQLite as the database, I was initially unsure why it was chosen over other databases. However, as I became more familiar with it, I appreciated SQLite's unique advantages. Firstly, it is lightweight and portable, making it an excellent choice for smaller projects. Additionally, it is easy to set up and use, making it ideal for rapid prototyping and development. Despite encountering issues with the driver used (mattn.github.io/go-sqlite3) due to the GCC version, I was able to resolve them after several hours of intense googling.
To handle the database operations, I created a DB struct that embeds the *sql.DB struct, and a User struct to represent the user data. Then, I created a helper function (OpenDB) to open a new database connection using the sqlite3 driver and a function (CreateUsersTable) to create the users table if it doesn't already exist.
package database

import "_ github.com/mattn/go-sqlite3"
/* The _ import is a blank import that imports a package without giving it a name.
Ensures that the package is imported and initialized, even though we are not
directly using any functionality from it in our code.  */

type DB struct {
  *sql.DB
}
/* Creating a new struct "DB" that contains the functionality of the
built-in struct "sql.DB" and can be used to interact with the database in a more
convenient and consistent way. */

type User struct {
  UniqueUserID int    `json:"unique_user_id"`
  Email        string `json:"email"`
  Password     string `json:"password"`
  Name         string `json:"name"`
}

func OpenDB(dataSourceName string) (*DB, error) {
  db, err := sql.Open("sqlite3", dataSourceName)
  if err != nil {
    return nil, err
  }
  return &DB{db}, nil
}

//CreateUsersTable function
func CreateUsersTable(db *DB) error {
  _, err := db.Exec(`
        CREATE TABLE IF NOT EXISTS users (
            unique_user_id INTEGER PRIMARY KEY AUTOINCREMENT,
            email TEXT NOT NULL UNIQUE,
            password TEXT NOT NULL,
            name TEXT NOT NULL
        );
    `)
  return err
}
When I began with user registration, I created a helper function to automatically add test users to the database on the first run. This allowed me to confirm the database connection and get comfortable with writing queries. Later, I discovered that using helper functions for this purpose is part of a technique known as migration, and there are existing packages designed to facilitate this process.
package mock

import "github.com/nik-don/01f-div01-real-time-forum/internal/database"

func SeedUsers(db *database.DB) error {
  users := []database.User{
    {Email: "user1@example.com", Password: "password1", Name: "User 1"},
    {Email: "user2@example.com", Password: "password2", Name: "User 2"},
    {Email: "user3@example.com", Password: "password3", Name: "User 3"},
    {Email: "user4@example.com", Password: "password4", Name: "User 4"},
    {Email: "user5@example.com", Password: "password5", Name: "User 5"},
  }

  for _, user := range users {
    if _, err := db.Exec("INSERT INTO users (email, password, name) VALUES (?, ?, ?)", user.Email, user.Password, user.Name); err != nil {
      return err
    }
  }
  return nil
}
Modifying the RunServer function to open a connection to the database, create the necessary tables if they do not already exist, and populate the tables with sample data
package web

import (
  "net/http"
)

var db *database.DB
//pointer to a struct of type DB defined in the package database

func RunServer() {
  port := "3000"
  addr := ":" + port

  /* Initialize a new http.Server struct. We set the Addr and Handler fields so
  that the server uses the same network address and routes as before, and set
  the ErrorLog field so that the server now uses the custom errorLog logger in
  the event of any problems. */
  srv := &http.Server{
    Addr:     addr,
    Handler:  Routes(), //get the servemux containing our routes.
  }

  var err error
  db, err = database.OpenDB("./database/forum.db")
  if err != nil {
    log.Fatal(err)
  }
  defer db.Close()

  // create the users table if it doesn't exist
  if err := database.CreateUsersTable(db); err != nil {
    log.Fatal(err)
  }

  // seed the db with mock data
  if err := mock.SeedUsers(db); err != nil {
    log.Fatal(err)
  }

  infoLog.Printf("Starting server on %s", srv.Addr)
  // Call the ListenAndServe() method on our new http.Server struct.
  err := srv.ListenAndServe()
}
Organizing the Frontend and Backend in the Project
In a way, I think it would have been better to separate the frontend and backend tasks, with Go handling only the backend. However, I realized that serving everything through Go simplifies the process and helps avoid CORS errors.
CORS, or Cross-Origin Resource Sharing, is a security measure implemented by web browsers to prevent web pages from making requests to a different domain than the one it originated from. When the frontend and backend are served from different domains, the browser may block requests, resulting in CORS errors.
By serving both the frontend and backend from the same domain with Go, I can bypass this issue and simplify the project's architecture. Additionally, this approach allows me to easily manage both the frontend and backend code in a single repository, making version control and deployment much easier.
However, in my opinion, for larger projects, separating the frontend and backend can be beneficial as it allows for more focused development, scalability, and the ability to use different technologies best suited for each part.
Colour Your Logs: Creating a Custom Logger in Go
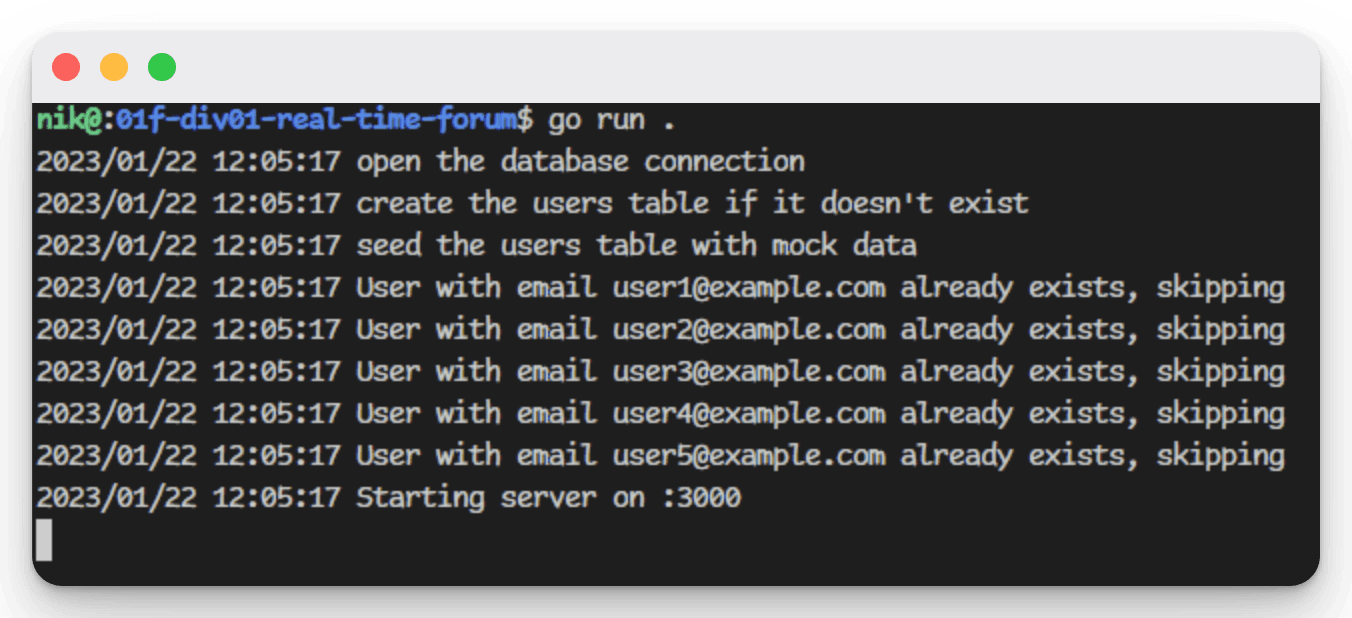
Logging plays a critical role in identifying faults or ensuring that a program is running as expected, as I learned from previous projects. To improve the readability and comprehensibility of the logs, I developed a custom logger package for this project by following the guidelines from the Let's Go book (opens in a new tab), with my own interpretation.
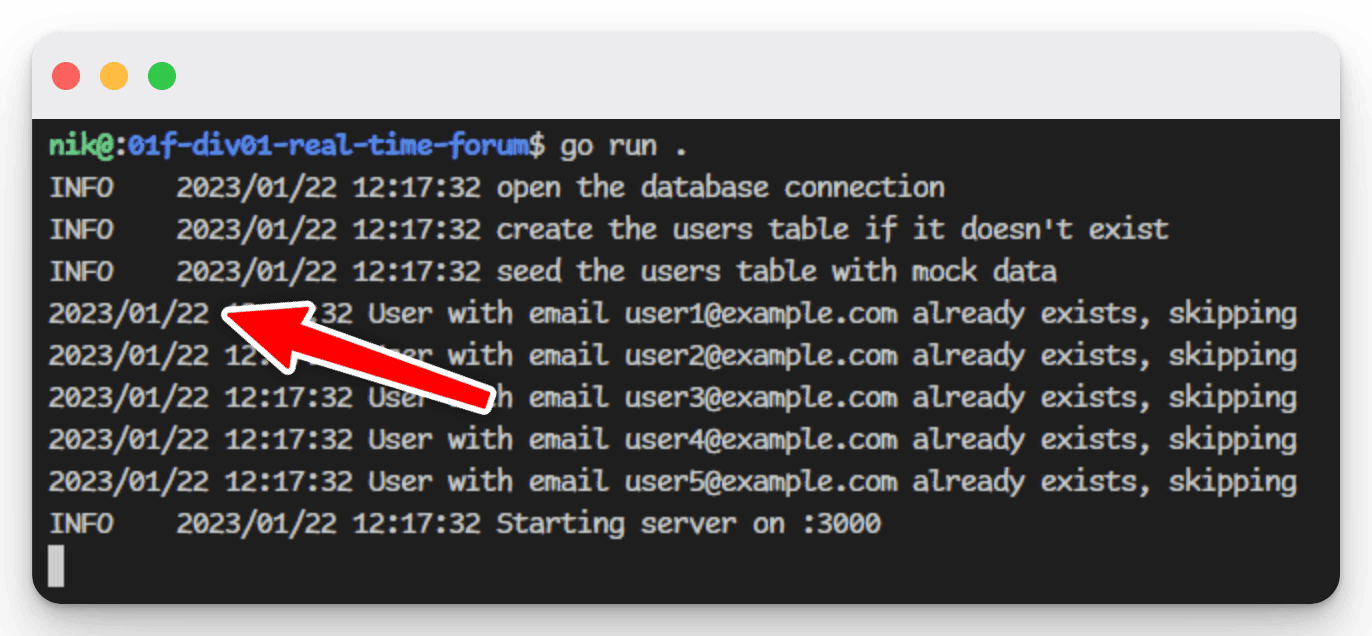
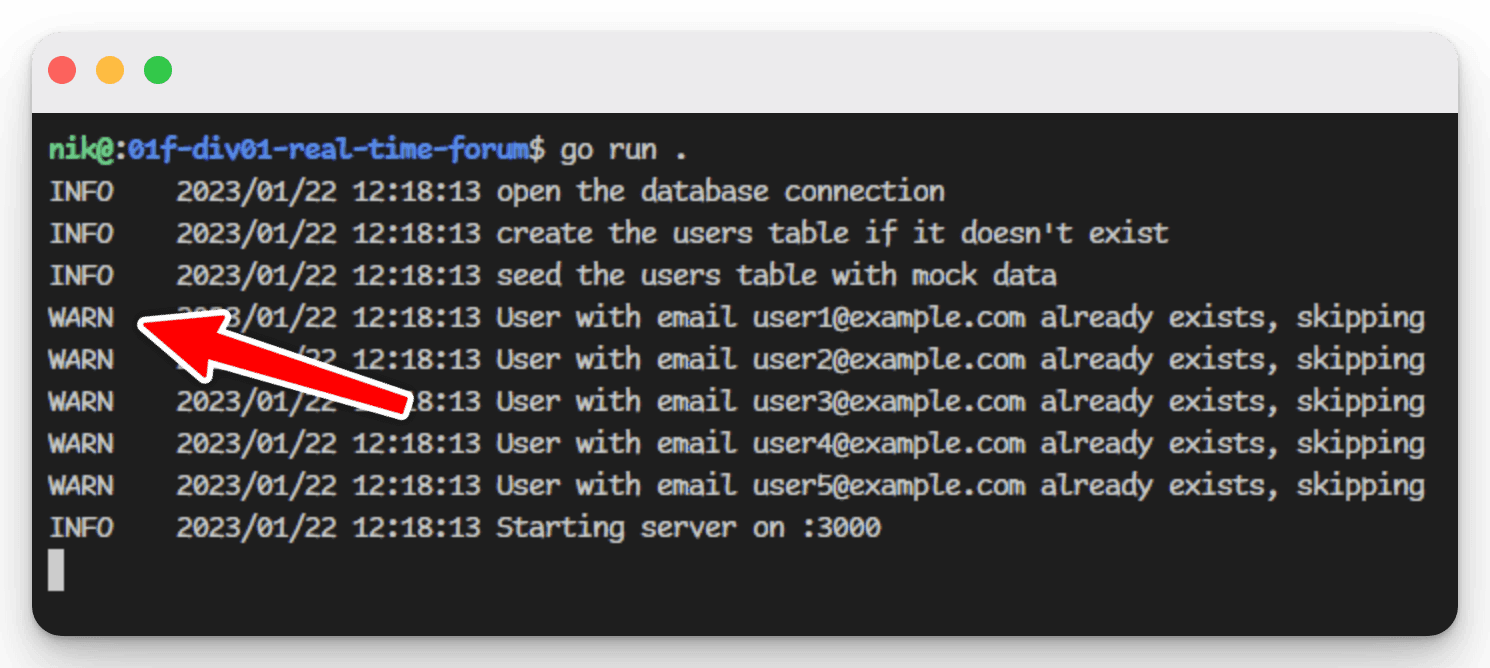
The meaning of the log messages is now clear, but they need to be set up consistently throughout the project. As shown in the images above, only the log message that utilized the custom logger package is properly formatted.
Here is the updated logger that I created using colour-coded ANSI escape codes to differentiate between different types of logs.
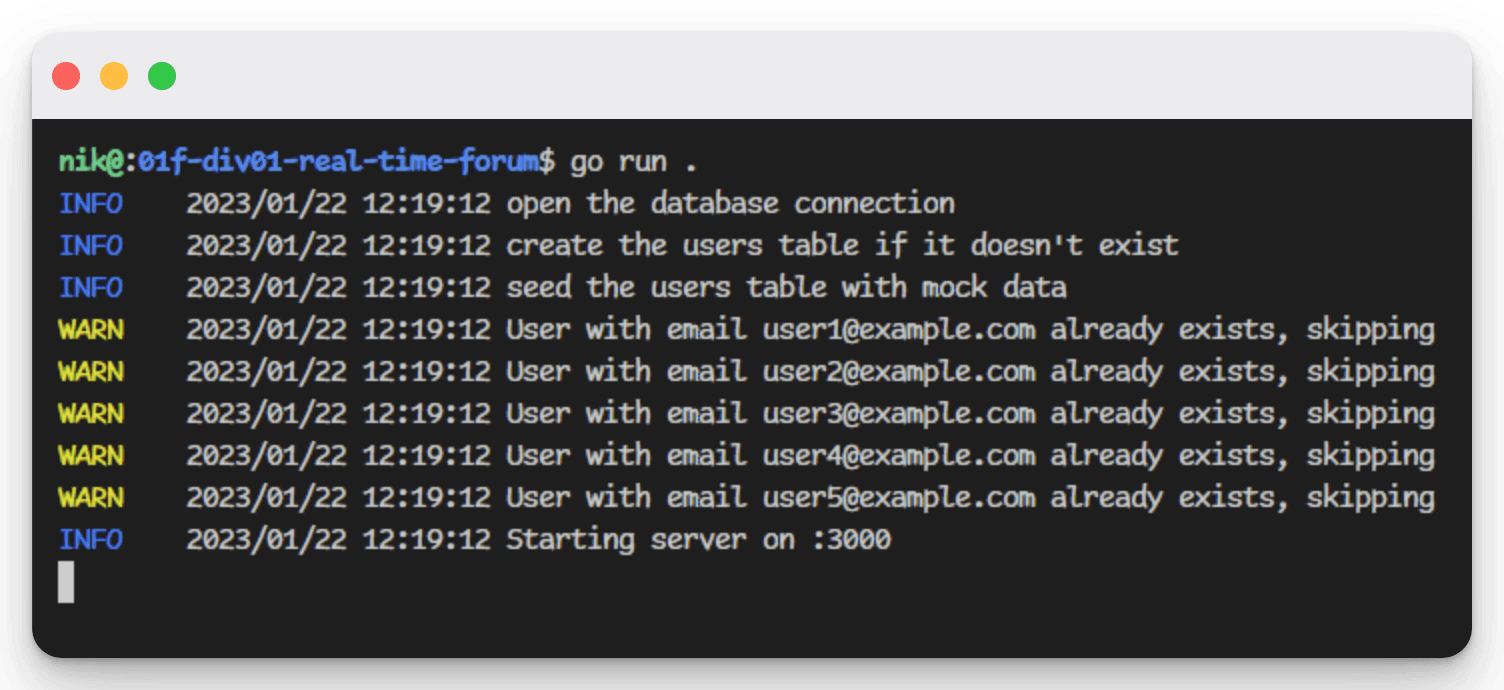
By creating three types of logs (Info, Warn, and Error) with colour-coding, the custom logger greatly improves the readability of the logs and makes it easier to identify and resolve issues. Furthermore, the logger was implemented as a separate package, making it easily reusable for future projects.
Refactoring the Code
Earlier, while setting up the groundwork, our main function (RunServer) started to get a bit crowded. Which is why I moved the route declarations for the application to a standalone routes.go file, to keep the code clear and focused. Similarly, for SQL queries and handlers, I've attempted some housekeeping to make the code easier to read and maintain.
However, I've hit a roadblock while trying to pass the DB connection from one package to another, resulting in cyclical imports. Although frustrating, this issue has also helped me gain a better understanding of Go methods.
With a better understanding of how to run DB queries and pass requests to a handler, I'm now focusing on implementing user registration. Using a form to register a new account, where the data needs to be stored in the DB.
..
// Note that func (db *DB) is added in front of the function name "GetUsers" to
// indicate that this function is a method of type DB. This is how Go implements method
// receivers on structs.

func (db *DB) GetUsers() ([]User, error) {
  rows, err := db.Query("SELECT unique_user_id, email, password, name FROM users")
  if err != nil {
    return nil, err
  }
  defer rows.Close()

  var users []User
  for rows.Next() {
    var user User
    if err := rows.Scan(&user.UniqueUserID, &user.Email, &user.Password, &user.Name); err != nil {
      return nil, err
    }
    users = append(users, user)
  }
  return users, nil
}
Forms - To show or Not to show
As anyone who has worked with forms can attest, they can be challenging to work with. I now have two forms (login and register). How Im handling the functionality to retrieve the correct input value for the email field:
I've assigned each form a unique ID and use: document.getElementById('id-of-form').elements.email.value
Additionally, I'm considering whether dynamically creating and destroying forms on the fly would be more efficient than creating multiple forms upfront. This approach could potentially improve performance and reduce clutter in the code.
During my research on this topic, I noticed that many of my colleagues use display:none and display:block to hide and show elements. However, after further investigation, I believe that visibility: hidden may be a better approach. This is because visibility: hidden hides the element without removing it from the document flow, maintaining the layout integrity, while display:none removes the element from the flow, which can cause layout shifts and reflows.
Another question that has come up is whether the requests should be sent via the HTML form action or through JavaScript fetch. While the HTML form action sends the request directly to the server, the fetch method allows for more control over the request and response. I'll need to weigh the pros and cons of each approach before making a final decision.
CRUD Handler
This is the general idea I used to implement the handlers: I used a switch case to handle requests based on the HTTP request method. By checking the method, we can perform different actions for different types of requests. For example, we might use the GET method to retrieve data from the server, while we could use the POST method to submit data to the server for processing. Using this approach allows for more flexibility and control in handling requests, and helps to keep the code organized and maintainable.
package handlers

import (
  ...
)

var Db *database.DB

func UserCRUDHandler(w http.ResponseWriter, r *http.Request) {
  switch r.Method {
  case http.MethodGet:
    //UserCRUDHandler GET request

  case http.MethodPost:
      //UserCRUDHandler POST request

    switch r.URL.Path{
      // Handle post request according to path
      case "/user/register"

      // decode the request body into a user struct

      // create the user in the database

      // return success status
      w.WriteHeader(http.StatusCreated)

      default:
      http.Error(w, "Invalid request path", http.StatusNotFound)
      errorLog.
    }

  default:
    http.Error(w, "Invalid request method", http.StatusMethodNotAllowed)
  }
}
Implementing Sessions and User Authentication with Cookies in Go
Moving on to implementing sessions, I found myself asking countless questions about where and how to start. For instance, what exactly is a session, and should it be stored in the database or in an in-memory data structure like a map? Moreover, should the session token be included in a cookie or a request header, and how can it be automatically revalidated?
To implement sessions, I needed to understand what a session is and how to get started with its implementation. While I was already familiar with the concept that sessions are used to keep track of a user's activities between multiple HTTP requests, I needed to learn how to implement them effectively.
Sessions provide a way to store user data and keep the user authenticated without the need to log in repeatedly.
It's worth noting that the order of implementing user registration and login is critical to session management. To check whether a user is already logged in, the sessions must already be implemented.
Interestingly, there is ongoing discussion among developers about using the term "sign-in" instead of "login," although I decided to stick with "login" for this project.
I also discovered that working with cookies can be complicated and requires careful attention. Specifically, setting the path can be tricky, and I initially struggled to retrieve the cookie correctly.
Implementing login with sessions and cookies, as well as setting up the project, took longer than expected. However, I was determined to write quality code rather than mediocre code, even if it meant taking longer to complete the project.
Here's how I tackled it:
On user login, a JSON is sent as a post request to the backend
The username and password are checked against the database
which is stored hashed using bcrypt encryption.
A session ID token is created
using uuid and stored in the session table.
A cookie is created on the client's browser
The sessions will be used to validate any subsequent requests
by checking if the user is authenticated, comparing the session token and its validity.
As I continued working on the project, I also wondered about the best approach to extend user sessions. It's something to consider in the future, as currently, when the session validity expires, the user session will be invalidated, and the cookie will be deleted from the browser, forcing the user to log in again.
Adding Dynamic Content: Client-Side vs Server-Side Rendering
Moving forward with the project, I began by adding functionality to add different categories to the database, followed by creating a form where users can create new posts.
However, I soon realized that I needed to consider both client-side rendering (CSR) and server-side rendering (SSR). If I chose to use SSR, the data couldn't be updated dynamically and would be dependent on the handlers endpoint.
For this project I used both server-side and client-side rendering. In this approach, the Go server handles the first request and renders the HTML template with the data as SSR.
State-management
To address the challenge of rendering content dynamically in a single-page application, I explored building a small API. As I mentioned earlier, CRUD and API are not the same thing. I needed to create a handler that could grab values from a URL and was more dynamic than a typical CRUD handler.
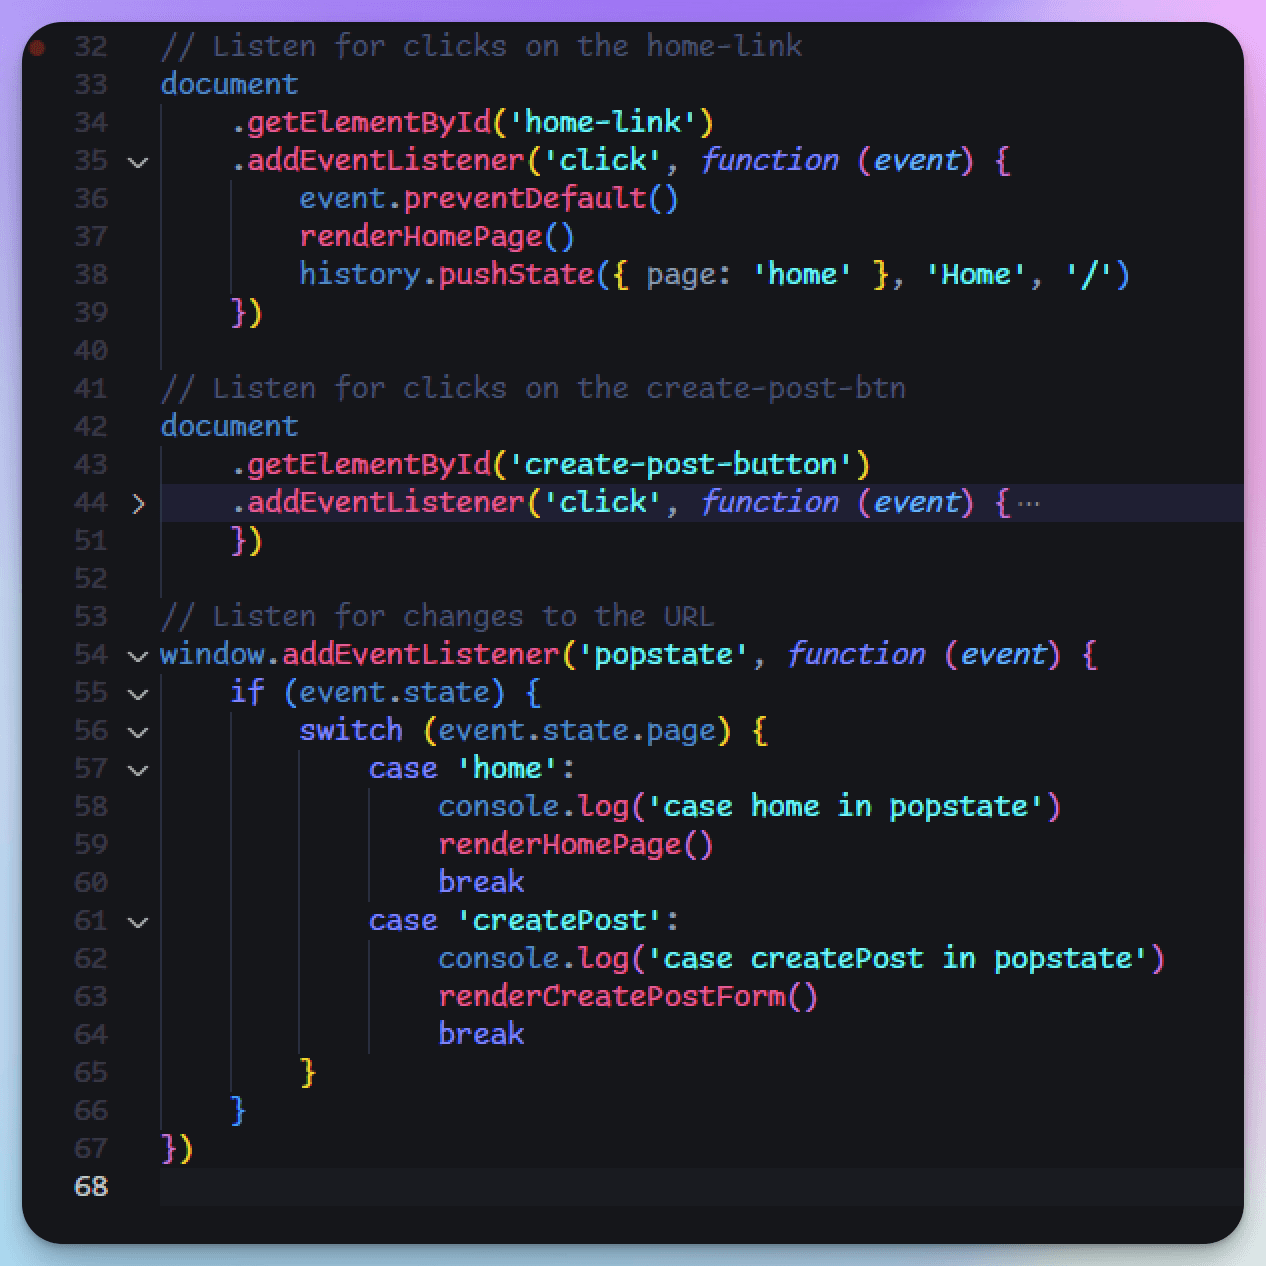
Traditionally, I would set links that take the user to another page and render the content for that specific URL. However, in a single-page app, this approach is not feasible. After some research, I discovered a state management method using the history.pushState method. This method updates the browser history by adding a new state with data, title, and URL, which is useful for single-page applications as it allows for navigation without reloading the page. I handled state changes with the popstate event.
While I used this method for a bit, it proved to be somewhat tricky to set up. I ultimately decided against adding extra functionality that might make my codebase harder to read.
Comments and Likes
Moving on from implementing posts, I started working on comments and likes, which required setting up comment and like tables in the database. However, as I went further into the implementation, I realized that the complexity was increasing exponentially, and I had to keep track of multiple things simultaneously.
Fortunately, the fetch functions written initially worked without any issues. However, as the project evolved, more scenarios arose where asynchronous operations became crucial, underscoring the importance of revisiting concepts like async and promises.
Handling asynchronous code effectively is vital for ensuring smooth data fetching and updating operations without blocking the main thread.
To integrate these asynchronous operations, the API/CRUD workflow for comments and likes involved adding event listeners to client buttons and links that made fetch requests to the server. The server would then handle the requests and update the database accordingly. This approach ensured that the user interactions were seamlessly integrated with the backend processes.
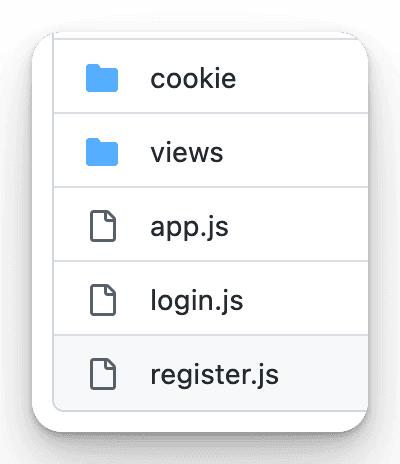
I decided to structure my code in a way that views were separated. My JavaScript folder structure looks like this:
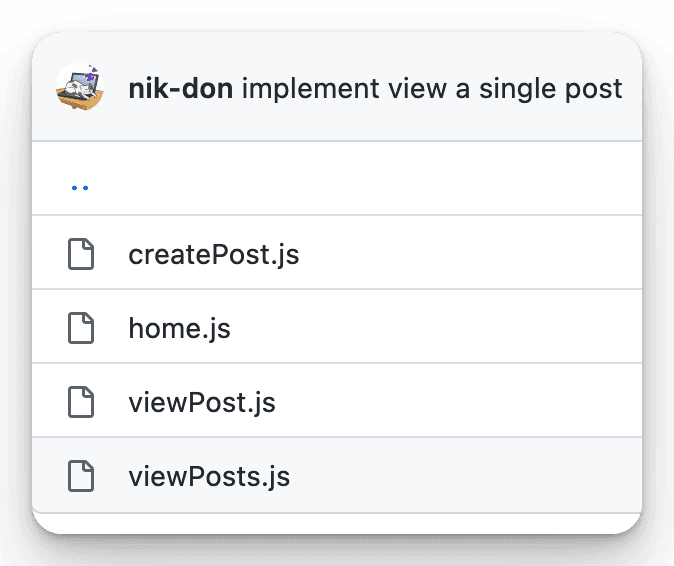
The View Posts page would display all the posts for a particular category, and include buttons to upvote and downvote each post.
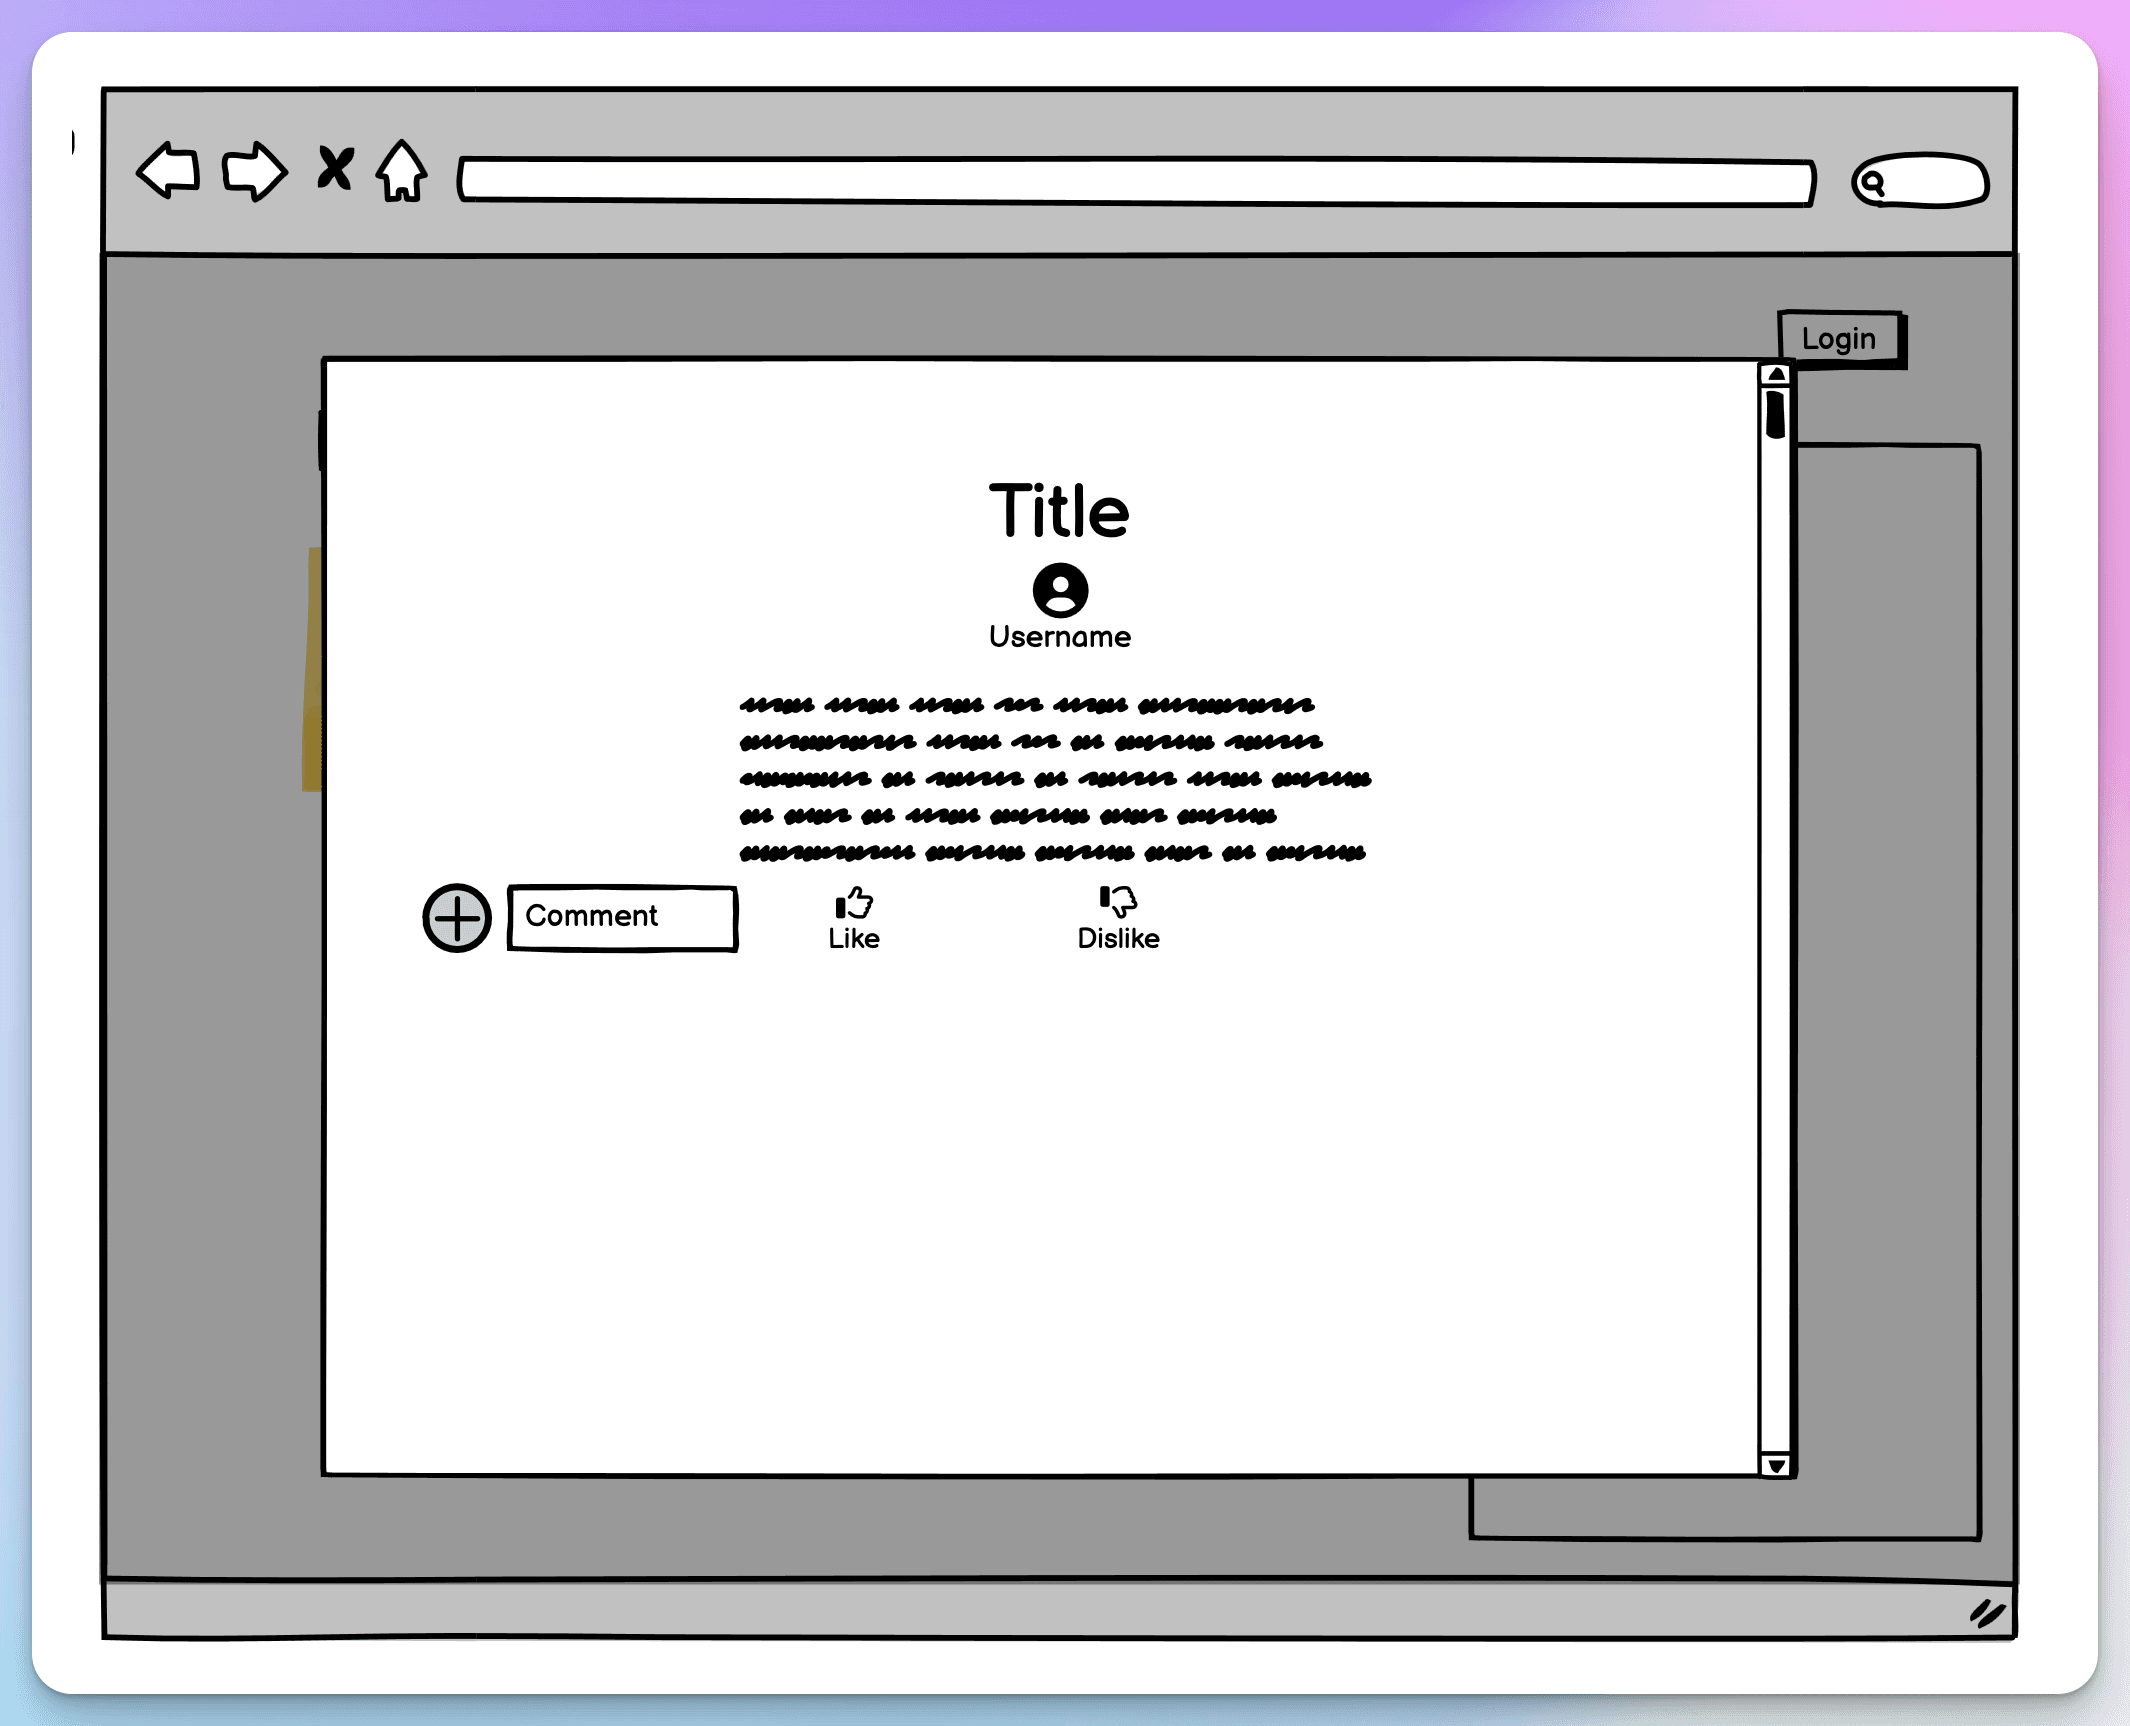
On the other hand, the View Post page would show a single post's content and allow users to add comments to it.
Real-time magic: Building a chat feature with Go and WebSockets.
As I approached the end of the project, my next task was to add a WebSocket connection for the chat feature. This involved several steps, including implementing the WebSocket protocol, designing the chatbox to make it slide out, adding loading elements, creating and displaying the messages.
WebSocket Implementation
I noticed that some of my colleagues were using Gorilla WebSocket chat example (opens in a new tab), which uses a hub. Personally, I felt that this approach was too complex and preferred a simpler approach.
The core of our WebSocket handler revolves around three main components:
- Upgrading the HTTP connection to a WebSocket connection
- Registering clients
- Handling incoming messages
Here's a snippet of my WebSocket handler:
package handlers

import (
    ...

  "github.com/gorilla/websocket"
)

// Create a websocket Upgrader instance
var upgrader = websocket.Upgrader{
  // Set the read buffer size to 1024 bytes
  ReadBufferSize: 1024,
  // Set the write buffer size to 1024 bytes
  WriteBufferSize: 1024,
  // Set a function to check the origin of the request
  CheckOrigin: func(r *http.Request) bool {
    // Return true to allow all origins to upgrade to a websocket connection
    return true
  },
}

func SocketHandler(w http.ResponseWriter, r *http.Request) {
  /* Each client that wants to establish a WebSocket connection must send a
  request to the server to initiate a new WebSocket connection. */

  conn, err := upgrader.Upgrade(w, r, nil)
  if err != nil {
    log.Println("Failed to upgrade HTTP connection to WebSocket:", err)
    return
  }
  defer conn.Close()

  // Register the new client

    // Loop to read incoming messages

    // Handle incoming messages based on their type

    // Send the newly received message to the broadcast channel

  }

  }
}
User Management
To manage online connected users, I used a map to store client connections and their information.
func makeUserList() []User {
  userList := make([]User, 0, len(clients))
  for _, user := range clients {
    user.Status = "online"
    userList = append(userList, user)
  }

  // get all users from db
  allusers, err := Db.GetUsers()
  if err != nil {
    errorLog.Printf("Error getting all users: %v", err)
  }

  // loop through all users and add them to the list if they are not already in the list
  for _, user := range allusers {
    found := false
    for _, connectedUser := range userList {
      if user.UID == connectedUser.ID {
        found = true
        break
      }
    }
    if !found {
      userList = append(userList, User{ID: user.UID, Name: user.Username, Status: "offline"})
    }
  }

  return userList
}
This approach allows for quick lookups and updates. When a new user connects or disconnects, we broadcast the updated user list to all clients:
var clients = make(map[*websocket.Conn]User)

func broadcastUserList() {
    userList := makeUserList()
    for client := range clients {
        client.WriteJSON(UserListMessage{Users: userList, Type: "user_list"})
    }
}
Message Handling
For handling messages asynchronously, I implemented a channel-based system:
var broadcast = make(chan chat.Message)

func HandleMessages() {
    for {
        msg := <-broadcast
        for client := range clients {
            if msg.Recipient == clients[client].ID {
                client.WriteJSON(msg)
            }
        }
    }
}
This approach allows for efficient message routing and delivery to the correct recipients.
Frontend Integration
On the frontend, I implemented JavaScript to connect to the WebSocket and handle different message types:
socket.onmessage = function (event) {
    const message = JSON.parse(event.data)
    switch (message.type) {
        case 'user_id':
            // Handle user ID
        case 'user_list':
            // Update user list
        case 'private_message':
            // Handle private message
    }
}
Then, I adjusted the event listeners for the chat user list and got the chat to work with private messages. I also updated the message format as per requirements.
I set up a chat table to save and retrieve messages from the database.
func createChatTable(db *DB) error {
  _, err := db.Exec(`
    CREATE TABLE IF NOT EXISTS chat (
      id INTEGER PRIMARY KEY AUTOINCREMENT,
      sender_id INT NOT NULL,
      receiver_id INT NOT NULL,
      message TEXT NOT NULL,
      sent_at DATETIME DEFAULT CURRENT_TIMESTAMP,
      FOREIGN KEY(sender_id) REFERENCES user(uid),
      FOREIGN KEY(receiver_id) REFERENCES user(uid)
    );
  `)
  return err
}
As I continued to work on the project, I realized that using structs for passing data into functions would have made the code more organized and maintainable. Structs allow for grouping related data together, making the function signatures cleaner and more intuitive. For instance, instead of using a function like func (db *DB) LikePost(sessionToken string, postID string, typeOfLike bool), it would have been better to use a struct to encapsulate these parameters, such as func (db *DB) storeMessageInDB(msg chat.Message) error. This approach not only simplifies the function signature but also makes the code easier to understand and extend in the future.
package chat

type Message struct {
  Type       string `json:"type"`
  Sender     string `json:"sender"`
  SenderName string `json:"senderName"`
  Recipient  string `json:"recipient"`
  Content    string `json:"content"`
  SentAt     string `json:"sentAt"`
}
UI/UX Considerations
One of the challenges I faced while working on the chat feature was how to handle scroll events and limit the number of messages displayed. I had to implement scroll events to retrieve the next 10 messages and limit the number of messages displayed to prevent clutter.
To enhance user experience, I implemented a sliding chatbox and used debounce for scroll events.
Sorting out the messages on scroll was tedious. I struggled to figure out how to put the messages in order. Eventually, I implemented a scroll event for messages limit and load on scroll with debounce.
chatboxMessages.addEventListener(
    'scroll',
    debounce(() => {
        if (chatboxMessages.scrollTop === 0) {
            // Load more messages
        }
    }, 500)
)
Another issue that I had to resolve was that the active tab did not change when clicking on users, causing messages to go to the wrong person.
I sorted the list of users by the last message exchanged only on login and moved the user from the user list to the top when receiving a private message or when sending a message.
function sortUsersByLastMessageSent(lastMessagesEndPoint, USERID, USERLIST) {
    // Fetch last messages and sort users
}
In addition to sorting out the messages, I also added changes to the chat username colour of the author received as a way of signaling that the user has received a message. Including displaying a notification using the browser.
// Display a notification
if (Notification.permission === "granted") {
  new Notification("New message", { body: message.content });
} else if (Notification.permission !== "denied") {
  Notification.requestPermission().then((permission) => {
    if (permission === "granted") {
      new Notification("New message", {
        body: message.content,
      });
    }
  });
}
highlightUser(message.sender, message.senderName);
Finally, I resolved an issue where the sorting of users who didn't have a message exchanged was not working correctly.
Additionally, I made the chatbox height fixed to avoid layout overflows.
Here is what the chat feature looks like:
Under the Hood
To truly understand how the chat feature works, let's follow the journey of a message from the moment it's typed to when it appears on the recipient's screen. This step-by-step breakdown will reveal the inner workings of the WebSocket-based chat system.
User Input and Client-Side Handling
When a user types a message and hits send:
- The JavaScript event listener captures the send event.
- It creates a message object with the following structure:
const messageJson = {
    type: 'private_message',
    sender: USERID,
    senderName: USERNAME,
    recipient: activeChatUserId,
    content: message,
    sentAt: new Date(),
}- This message is then sent over the WebSocket connection:
socket.send(JSON.stringify(messageJson))
Server-Side Message Reception
On the server side:
- The WebSocket handler receives the message in its message loop:
for {
    var msg chat.Message
    err := conn.ReadJSON(&msg)
    if err != nil {
        // Handle error...
    }
    // Process message...
}- The message is then processed based on its type. For a private message:
case "private_message":
    // Handle private message
    lock.Lock()
    err := Db.StoreMessageInDB(msg)
    if err != nil {
        errorLog.Printf("Error storing message in db: %v", err)
    }
    lock.Unlock()

    pushMessageToClient(msg)
Message Storage
Before forwarding the message, it's stored in the database:
- The
StoreMessageInDBfunction inserts the message into a database table. - This ensures message persistence even if the recipient is offline.
Message Routing
The server then routes the message to the intended recipient:
- The
pushMessageToClientfunction sends the message to the broadcast channel:
func pushMessageToClient(msg chat.Message) {
    broadcast <- msg
}- The
HandleMessagesfunction, running in a separate goroutine, picks up the message:
func HandleMessages() {
    for {
        msg := <-broadcast
        for client := range clients {
            if msg.Recipient == clients[client].ID {
                client.WriteJSON(msg)
            }
        }
    }
}
Client-Side Message Reception
Back on the client side:
- The WebSocket onmessage event listener receives the message:
socket.addEventListener('message', (event) => {
    const message = JSON.parse(event.data)
    if (message.type === 'private_message') {
        // Handle incoming private message
    }
})- If the chat with the sender is active, the message is immediately displayed:
if (activeChatUserId === message.sender) {
    addIncomingMessage(message.sender, message.senderName, message.content)
}- If not, a notification is shown and the sender is highlighted in the user list:
new Notification('New message', { body: message.content })
highlightUser(message.sender, message.senderName)
UI Update
Finally, the UI is updated to reflect the new message:
- The
addIncomingMessagefunction creates a new message element and appends it to the chat box.
// function to add incoming message to chatbox
function addIncomingMessage(author, authorName, text) {
    // check if chat is active before adding message
    const chatboxMessages = document.querySelector('#chatbox-messages')
    if (isChatActive(author)) {
        const message = createMessage(author, text, authorName, new Date())
        console.log('Adding incoming message', message)
        chatboxMessages.appendChild(message)
        scrollToBottom(chatboxMessages)
    }
}- The chat box is scrolled to the bottom to show the new message.
- The sender is moved to the top of the user list to indicate recent activity.
function moveUserToTop(userId, userName) {
    // Move user to top of list...
}
Future Improvements
The Power of Go's concurrency model and efficient handling of WebSockets proved invaluable in creating a responsive, real-time application. Moving forward, potential enhancements could include group chat functionality and message encryption. For prodution, I would also need to consider security measures such as rate limiting and input validation to prevent abuse and attacks, and a queing system to handle large volumes of messages.
For those interested in exploring this project further or adapting it for their own use, the source code is now available. While the code has been meticulously designed to meet the course objectives, please be aware that additional development and testing are necessary to make it production-ready.
You can access the source code here (opens in a new tab)
Please note, this link directs you to a product page. The source code is offered as an educational resource for those who wish to gain a deeper understanding of the concepts discussed in this blog post.